In my previous article, The Single Most Important Aspect of Kettlebell Sport, I spoke about the importance of efficiency in kettlebell sport and explained how to achieve a more efficient rack position. Now I would like to take a more detailed look at the jerk and how to properly execute it in kettlebell sport.
In my previous article, The Single Most Important Aspect of Kettlebell Sport, I spoke about the importance of efficiency in kettlebell sport and explained how to achieve a more efficient rack position. Now I would like to take a more detailed look at the jerk and how to properly execute it in kettlebell sport.
Jerk Technique is Critical to Kettlebell Sport
The jerk is the first of two lifts required in the Biathlon, a competition event. The second lift in the Biathlon is the snatch. Male athletes currently compete using two kettlebells in the jerk. Female athletes can choose to compete either with two kettlebells or just one, depending on what organization or federation is holding the meet. Whether using one kettlbell or two, the same technical considerations apply to the jerk.
The key to success at a ten minute competition set in kettlebell sport is to develop an excellent jerk technique. Most newbie kettlebell sport lifters approach this lift by “muscling” the bells overhead, using the legs too little and the arms and shoulders too much. This is workable to a point with lighter kettlebells, but as soon as the weight becomes more challenging, this way of lifting falls apart.
To achieve high reps with heavier kettlebells, it is necessary for the kettlebell sport athlete to understand that speed and efficiency in the jerk comes from the ability to produce explosive power from the legs. This power must be combined with the skill of quickly relaxing the entire body to drop and catch the kettlebells overhead. Explosive power in the legs makes the kettlebells fly in the jerk.
Let’s take a closer look at the five key stages of the kettlebell jerk and how to refine your technique in each part of the lift.
The 5 Technical Stages of the Kettlebell Jerk: 1. Rack Position
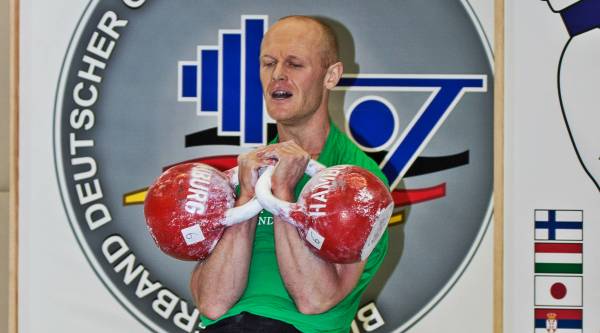
The jerk begins with the elbow resting on the crest of the pelvis. (Photo courtesy of Andrew Bellamy)
To begin the jerk, a good rack position with the elbows resting on the iliac crests is vital. The optimal rack position takes the load off the lifter’s shoulders and allows them to be as relaxed as possible. If the shoulders are tensed too early, they will be used excessively during the execution of the lift.
The 5 Technical Stages of the Kettlebell Jerk: 2. First Dip

Continue to dig the elbows deep into the hips, or at least into the abdominal area, as the knees bend for the first dip. (Photo courtesy of Andrew Bellamy)
In the first dip of the jerk, the lifter must let the knees bend slightly in a crisp movement whilst making sure the elbows stay in contact with the hips. This will ensure the athlete does not squat as the hips move forward, not backwards.
The 5 Technical Stages of the Kettlebell Jerk: 3. Bump

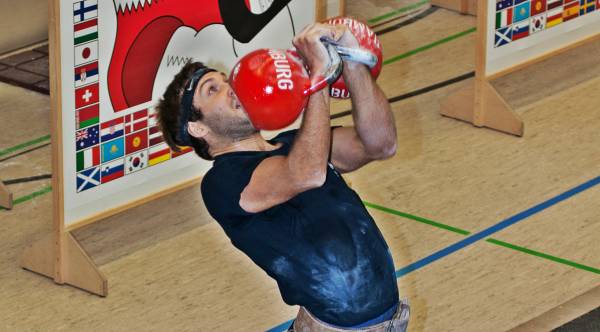
Drive with the legs and soften the arms in the bump. (Photo courtesy of Andrew Bellamy)
The triple extension, or bump as it is known to kettlebell lifters, quickly follows the first dip. The lifter should explosively extend all the joints in the lower body and push the elbows off the hips. The bump should be powerful enough to make the bells disconnect from the shoulders and reach head height. Here, I cue athletes to imagine they have arms made of jelly to get their legs to do all the work.
The 5 Technical Stages of the Kettlebell Jerk: 4. Second Dip

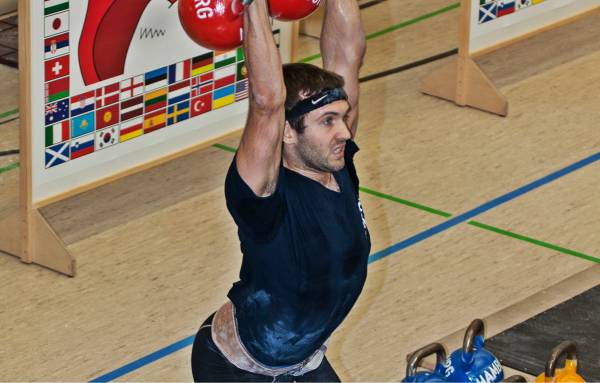
Drive upwards and swiftly sit under the bells in the catch. (Photo courtesy of Andrew Bellamy)
The second dip should be performed immediately after the bump, as soon as the bells reach head height. The lifter should squat under them, quickly relax the legs, send the hips back, and extend the elbows. To successfully achieve the second dip, it is important that the lifter is lighting fast in switching his or her attention from driving upwards to “sitting” under the bells. A coaching tip: I find it helpful is to say “down!” as soon as the lifter achieves triple extension.
The 5 Technical Stages of the Kettlebell Jerk: 5. Fixation

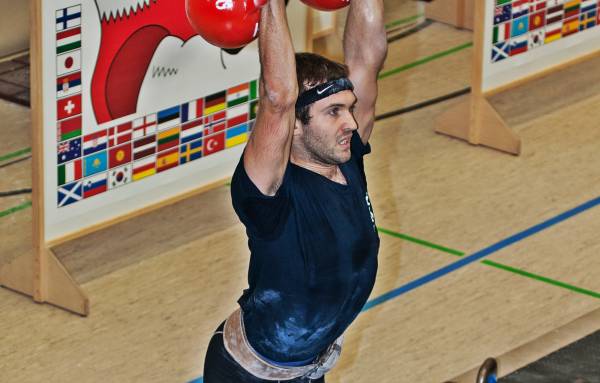
Extend the knees and stand with the bells overhead to complete the lift. (Photo courtesy of Andrew Bellamy)
With the bells now locked out overhead, all that needs to be done is to extend the knees and stand. Fixation is achieved when the kettlebells and the lifter’s body have stopped moving and there is a brief pause in the overhead position. The athlete should then relax the arms and let the kettlebells drop freely, moving the head back slightly, catching the bells with the body, and absorbing the shock with the knees. The elbows should then reconnect with the hips to achieve a good rack position to recycle the movement.
In the overhead position, the lifter should aim to keep the quads completely relaxed. Thinking of letting the kneecaps drop is a great cue for this. If you watch an experienced lifter perform the jerk, you will see a noticeable wobble of the quads as they relax when the fixation overhead is reached.
Excellent Breathing Means Excellent Lifting
To repeat high and heavy reps in kettlebell sport competition, understanding the correct breathing pattern in the jerk is vital. Correct breathing technique helps keep the mental panic at bay during arduous sets. Excellent breathing goes hand in hand with excellent lifting.
The primary thing to remember about breathing technique in the jerk is that at no point should the athlete hold his or her breath. Holding the breath will cause uncontrolled rises in heart rate and blood pressure and will prematurely fatigue the lifter. Breaths should be taken in measured sips as opposed to large uncontrolled gasps.
the optimal kettlebell jerk breathing sequence is:
- The First Dip – Exhale
- The Bump – Inhale
- The Second Dip – Exhale
- Fixation (whilst reaching knee extension) – Inhale
In competition, two things will need to change in this sequence depending on the tempo the lifter is keeping. There will either be no pause between lifts and once fixation is achieved the lifter can let the bells drop and exhale; or there will be a pause in the locked out overhead position, in which case the lifter will need to keep breathing with the bells held overhead before dropping them to start again.
Work the Basics for Greatness
Kettlebell sport can sound unbelievably complicated, but over time and with practice, lifting technique becomes easier to execute. As always, I recommend that any athlete wanting to get involved in kettlebell sport should get in touch with an experienced coach. Advice from a good coach will save months of guesswork, poor results, and potential injuries – and it will help a beginner enjoy the sport an awful lot more.
If you’re a beginner kettlebell lifter, you will find yourself trying to rush the process and not spending enough time working on the basics. This was true for me starting out, and I am convinced it cost me months, if not years, of progress. Trust me – every moment spent practicing your technique and breathing pattern is worth its weight in gold. So drill your technique and start mastering your kettlebell jerk today.
New to Kettlebell Sport? Check This Out:
Kettlebell Sport: What It Is and How to Get Started
Coaches: Are You Drilling Technique Enough?


