If you’re going to do handstands or many other gymnastic moves, then your hands and wrists can take a beating. Think about it: if you’re on your hands, your wrists are flexed back ninety degrees (or sometimes more) while bearing your entire body’s weight. Do this for a while and you’ve compounded lots of volume on top of that. For some people this never seems to be an issue. They’re naturally more flexible.
If you’re going to do handstands or many other gymnastic moves, then your hands and wrists can take a beating. Think about it: if you’re on your hands, your wrists are flexed back ninety degrees (or sometimes more) while bearing your entire body’s weight. Do this for a while and you’ve compounded lots of volume on top of that. For some people this never seems to be an issue. They’re naturally more flexible. Others don’t seem to have quite the flexibilityand if they’re not smart about it, it can be painful and even injurious if you train your wrists too hard and too much.
I fall into that later group. Back in high school I played football and it was during that time that I injured my right wrist. It wasn’t broken, but a bad sprain caused it to become much less flexible than my left wrist. And since that injury, any time my wrist was flexed back I’d be in pain.
Fast forward a number of years and I was working on handstands. Sometimes the pain was better, at other times it was worse. There came a point when it got much worse, and any time I placed my hand flat on the floor I‘d be in pain.
After much warm up, I could do handstands, but even then I would be leaning to my left side. The problem (and the pain) inhibited me from going any further in my hand balancing practice. It also impacted other things like bridging exercises and gymnastics. Even something as simple as a push up could still cause pain.
At one point I got fed up with it. It got so bad I decided I was going to do everything within my power to fix it. And I did. My right wrist is still not as flexible as my left, but there is no pain from it anymore. I accomplished this by forming a two-pronged attack plan:
Attack #1: Strengthen the Mind
First and foremost, I focused on the mind. Why? Because how we perceive injuries is important in how they affect us. Every cell in your body is constantly being replaced. Even bone cells, which stick around much longer than other cells, are being replaced constantly.
It is said that every seven years every cell in your body will be different from the previous seven. Yet a chronic injury can be around longer than that. Something in your mind is holding that injury there, and by changing your mind, you can help your body to heal. This is a missing component in most rehab scenarios.
Attack #2: Strengthen the Injury
Second, I did a number of physical drills in order to make my wrists stronger, more flexible, and more resilient. It’s a few of those drills that will be the focus of this article. A little work doing these drills regularly may be all you need to stay pain free and continue to build your flexibility. I like to do these before any sessions that involve me putting weight on my hands. This way they can be useful as a prehab tool.
The most difficult, and sometimes painful position, for many people is with the hands bent backwards at around ninety degrees. Some people can’t even get into that range of extension. But, as with anything, flexibility can be built, step-by-step over time. Here are three exercises that can help you achieve freedom in your wrist flexibility:
Drill #1: Wrist Extension Drill
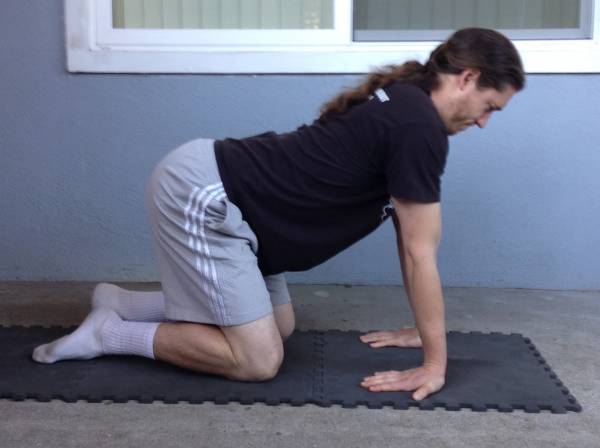
Of all the ways possible to stretch the wrists, I like this drill the most. Place your hands flat on the ground facing back towards your body. Inside shoulder width is a good starting place. Ultimately, you’ll want to have the forearms touching. From a kneeling position you can lean back to get more of an angle on the wrists, while keeping the elbows locked.

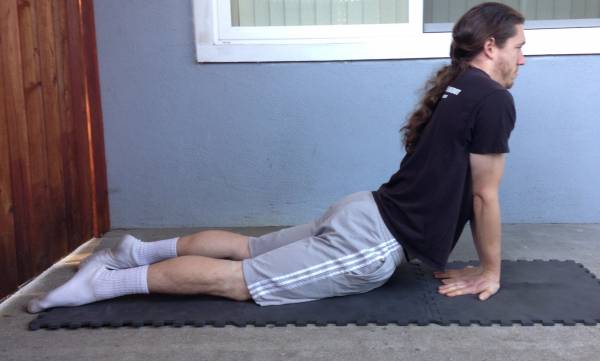
If you can, straighten your legs and arch your back, like the cobra position in yoga. This puts more of your weight onto the hands. Once again you can rock forwards or back to get an easier or lesser angle. Hold for thirty seconds.

Drill #2: Wrist Release Drill
One of the most important aspects of stretching is that of opposites. If you go one way, then you’ll also want to go the other. This drill is called the wrist release because it can help to give you release after you’ve done a lot of work in the wrist extension position. This is great to do after each set of extensions or as needed.

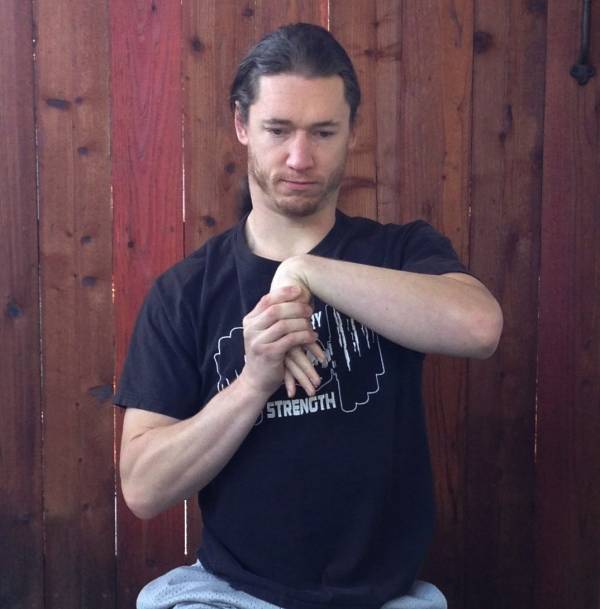
Place one hand on the back of the other with the hand flexed towards the wrist. Hold the hand in place by applying some pressure on it and move the forearm lower to increase the angle. Hold for six to ten seconds, then work the opposite arm.
Drill #3: Jumping Back of Wrist Push Ups
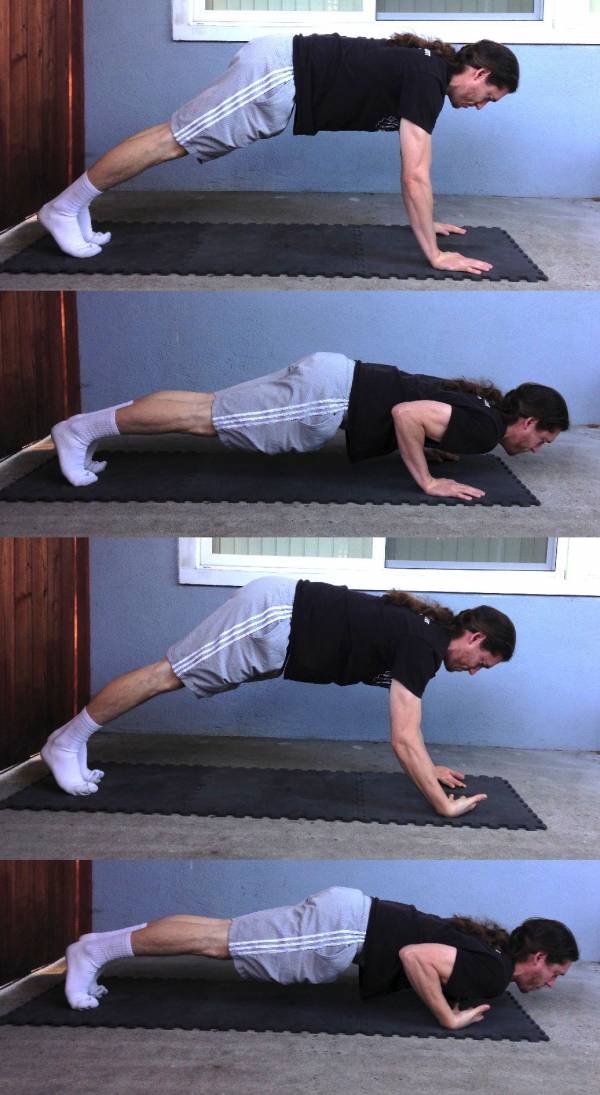
Just by following the above two drills you could likely work up to this drill, although there are a number of other exercises and variations to help, as well. This drill is more of a “look what I can do” exercise to prove you have decent wrist strength and flexibility, rather than a way to build it.

Start in a normal push up position. Descend and then explode up as if doing a clapping pushup. Instead of clapping, move your palms off of the floor and set the backs of your hands on it. Do a push up in this position, then jump into the normal hand position. Repeat back and forth. (Note: I find the easiest hand position for the part where you’re on the backs of the hands is to have the fingers pointing towards each other.)
Caution: If you’re not ready for these, they could cause an injury so proceed with this challenge in a smart way. Also, it is recommended to do these on some sort of padded floor or carpet.
If you are working on handstands, gymnastics, breaking, or anything else where you’re on your hands a lot, I would highly recommend doing the first two exercises every day. If you’re working to overcome a chronically inflexible wrist, I would do them several times a day. In doing so, you can help build up the flexibility you need.
Photo 1 courtesy of Shutterstock. All other photos courtesy of Logan Christopher.


