Wrist injuries are common in yoga, yet we ignore them and move in to poses that put pressure on our wrists without knowing how our muscles support this complex joint.
We can learn to take care of our wrists by understanding alignment and anatomy. The strength of the muscles in our arms and shoulders will determine our wrist strength.
Causes of Wrist Injuries
Wrist injuries can be caused for many reasons, but the one that stands out the most is poor alignment of the shoulder.
Congestion in the neck and shoulders can impede blood flow and nerve transmission into and from the wrists. Other causes of wrist pain include osteoarthritis, carpal tunnel syndrome, lack of flexibility, tendonitis, repetitive strain injuries, sprains and other sudden injuries.
“If the wrists are not strong or flexible enough to prevent the bones from touching, impingement can happen and aggravate the tendons and ligaments in the area.”
Dr. Kevin Launder, a kinesiologist at Illinois State University, said, “Wrist pain is often caused by impingement, an injury that occurs when your radius (arm bone) hits your wrist bones. It typically happens in people who do a lot of yoga.”
In yoga, we are mostly in postures that extend the wrist. For example, plank pose puts a lot of pressure on the joint. If the wrists are not strong or flexible enough to prevent the bones from touching, impingement can happen and aggravate the tendons and ligaments in the area.
The Anatomy of our Hands and Wrists
The hand is designed to bear weight, but it also has a complicated joint structure. It has many stable yet flexible parts with complex muscles and joint actions. 39 muscles work the wrist and hand, while at the same time no muscle works alone.
The wrist is an ellipsoid-type synovial joint, allowing for movement along two axes. This means flexion, extension, adduction, and abduction can all occur at the wrist joint. All the movements of the wrist are performed by the muscles of the forearm.
“Over time, wrist extensors may become weak relative to the wrist flexors, which leads to an imbalance. This means when you are in downward dog or any other weight-bearing pose on the hands, your body will find it difficult to properly distribute the weight to your wrists.”
The anterior forearm (top side of the arm) has the wrist flexors muscle group. These flex the hand at the wrist and each of the phalanges (these make the fingers).
This muscle group tends to be tense due to overuse. Conversely, the underside of the forearm, the extensor muscle group, going from the palm to the inner elbow, is fairly weak in most of us due to the lack of use.
Over time, wrist extensors may become weak relative to the wrist flexors, which leads to an imbalance.
This means when you are in downward dog or any other weight-bearing pose on the hands, your body will find it difficult to properly distribute the weight to your wrists.
Since your body is intelligent, it will recruit one muscle group to compensate for another and thus the imbalance can lead to injury.
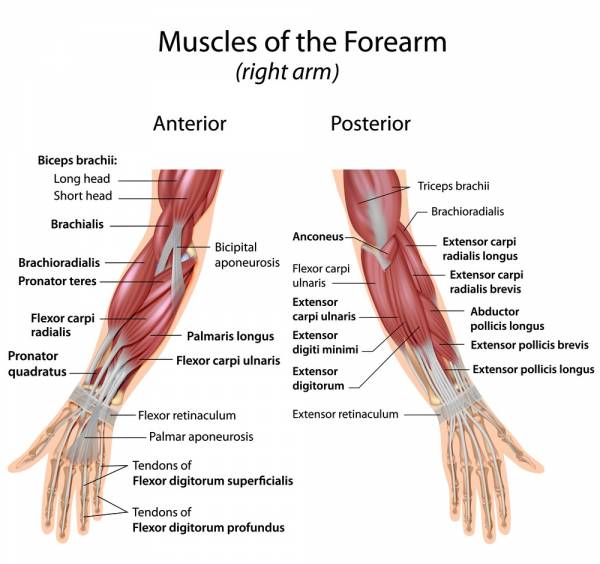
Wrist Anatomy
The two bones of the lower arm, the radius and the ulna, meet at the hand to form the wrist.
The wrists are made up of eight small bones called the carpal bones. They connect the hand to the forearm. The shape of the carpal bones, as well as the overlying ligament (the transverse carpal ligament) creates a kind of tunnel (the carpal tunnel) through which the tendons of the flexors and the median nerve travel.
The forearm bone closest to the thumb, the radius, is a larger than the ulna. This bone is capable of bearing more weight because of its size.
Due to this, it is essential that we place more weight on the mounds of our thumb, index, and middle finger and less so on the ring and pinky side.
“To protect this sensitive joint, more weight should be placed on the heel of the hand while at the same time, using the fingers pads to distribute the weight evenly.”
Most often, due to weak upper arm and shoulder strength, our weight automatically falls on the outside of our hands. This weight on the heel of the palm will lift the index finger off the floor placing a great degree of tension on the ulna, which isn’t designed to bear as much of a load.
To protect this sensitive joint, more weight should be placed on the heel of the hand while at the same time, using the fingers pads to distribute the weight evenly.
Downward Facing Dog
Downward facing dog is the most commonly noted pose where students experience wrist pain.
It is also a great pose to refine the alignment of our upper body. Since the hands are a part of the foundation of the pose, we need to pay as close attention to them as we do to our feet.
The downward dog pose is commonly held for a few breaths to get a proper stretch, and during this time students often neglect to distribute the weight evenly between the hands and the feet.
Downward dog is an exceptional pose that builds strength across the shoulders, while increasing the range of motion in the upper body.
That being said, if your shoulder blades are collapsing in your dog pose, with your upper arms rounding, elbows moving out, and your weight placed on the heel of your hand, you will be out of optimal alignment in the upper body.
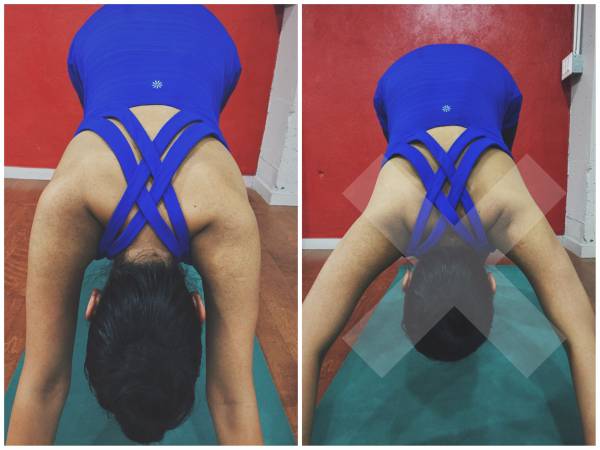
If your shoulder blades are collapsing in your dog pose as shown at right, you will be out of optimal alignment.
Here are a few alignment principles for the shoulders, arms and hands in almost any weight-bearing pose. These actions can first be practiced at the wall to lessen the weight bearing involved. Then, you can work your way to the mat.
- Hands placed shoulder width apart.
- Distribute the weight to the finger pads (towards the index finger side) away from the heel of the palm.
- Press all the finger pads and knuckles evenly onto the surface.
- Straighten the arms to engage the triceps and squeeze them in.
- Broaden across the upper arms and expand the chest.
- Firm your shoulder blades against your back then widen them and draw them toward your tailbone.
- Maintain your head between the upper arms without letting it hang.
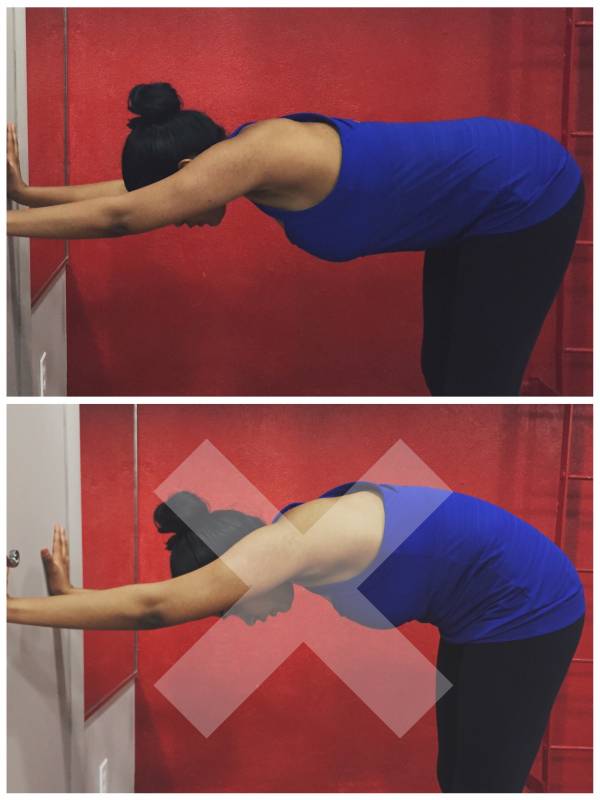
Downward dog at the wall can help establish good wrist alignment.
Strengthening the Wrists
Correcting habitual misalignment and stretching the wrists is a great way to start a strengthening program for the wrists.
But in general, there isn’t much you can do in yoga to isolate the muscle groups and strengthen them. You can do simple exercises that strengthen the ligaments, though.
Wrist Curls
This can be done with 1-5lb weights or with a clenched fist. Do 3 sets of 12-15 repetitions.
- Begin seated and hold two weights in each hand.
- Rest your wrists over your knees with your palms facing down.
- Slowly curl the wrists in an upward motion and pause at the top for a second before releasing them down again. Take caution not to overextend.
- Repeat the same exercise with the palms facing up.
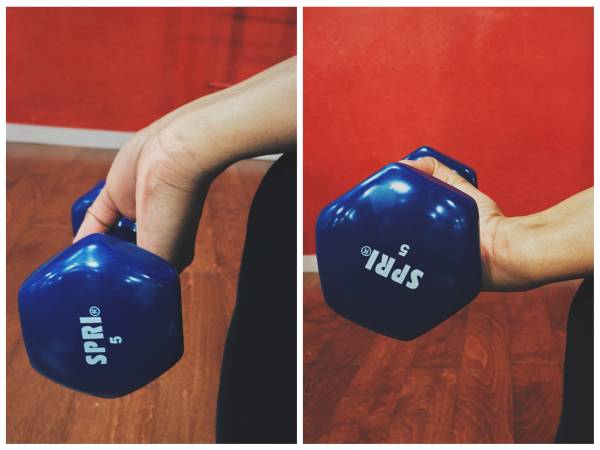
Wrist curls exercise
Ball Squeeze
Take a stress ball or tennis ball and grip it in your palm as firmly as possible with your fingers. Hold for 5 seconds and repeat about 10 times. Switch hands. There are a few variations you could do with a ball squeeze.
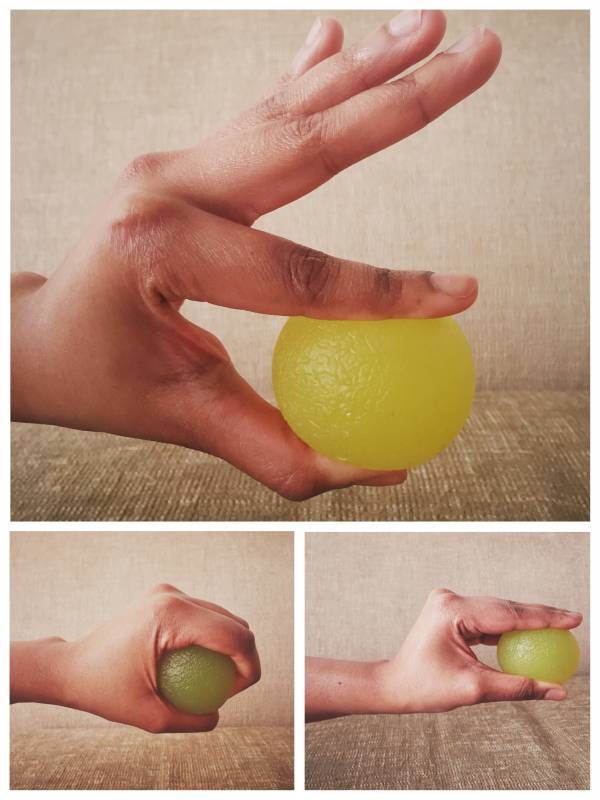
Variations on ball squeeze exercises
Towel Wring
Take a dry towel and twist the towel in opposite direction, as if to squeeze the water out of it. Hold the contraction at the end for a few seconds. Be mindful of overstretching as this can aggravate your already injured wrists. Switch sides and repeat 8-10 times.
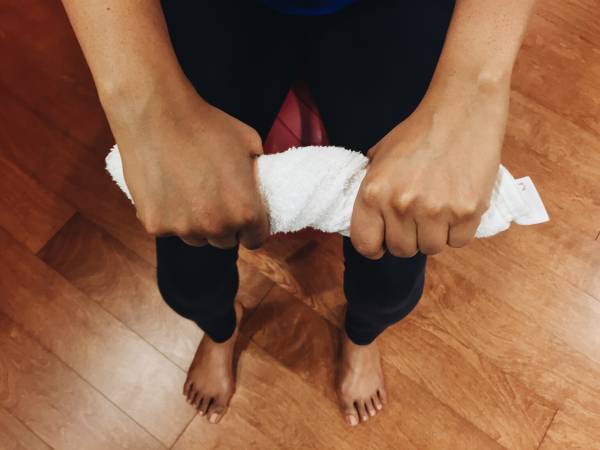
Towel wring exercise
Be Aware
It is important to be aware of how fatigued you get while doing any weight bearing on the hands and to give yourself enough rest between poses.
Good wrist strength is essential to our everyday activities and yoga can be a great tool to teach us more about how to take care of our wrists.
You’ll also enjoy:
- 3 Stretches to Help Achy Wrists and Prevent Carpal Tunnel
- 3 Drills for Building Wrist Flexibility
- Finger and Wrist Stretches to Combat Your Modern Lifestyle
References:
1. Keller, Doug. “Healing (and Preventing) Wrist Injuries.” Yoga International. N.p, 20 June 2013. Web
2. American Academy of Orthopedic Surgeons. Tips to prevent yoga injuries, March 14, 2007.
3. Hamill, Joseph, and Kathleen Knutzen. Biomechanical Basis of Human Movement. Philadelphia: Lippincott Williams & Wilkins, 2003. Print
4. Fishman, Lauren M, Ellen Saltonstall, and Susan Genis. “Understanding and Preventing Yoga Injuries.” International Journal of Yoga Therapy, June 2009. Web
Photos 1 and 2 courtesy of Shutterstock.


