This week, one of my students told me she had knee pain after running. A coach advised her to keep her glutes engaged during lifting to abate knee pain. I like this advice alright, as it generally will help keep all of the muscles of the legs engaged. However, the glutes are already the strongest muscles in our bodies. They tend to take over in back extension and many lifts, so it is ideal for the body to learn to use them a little less. Keeping the legs engaged is a key functional tip to both protect the knee from serious injury in the long-term and treat pain in the short-term, and it will be better for the back than squeezing the glutes. Ultimately, strengthening the hamstring muscles is critical in protecting the knees.
Hypermobility in the Hamstrings and Knees
Many athletes think their hamstrings are tight, and they believe hamstring stretches are key to keeping the back and knees healthy. To some degree, this is correct. But for many of us, hypermobility in the hamstring attachment can leave us susceptible to injuries. I received knee repair surgery on three crucial ligaments in 2003. Today, when I coach my young soccer athletes, I teach them to engage all of the muscles on the leg whenever a foot is planted in order to avoid hyperextension of the knee ligaments.
Soccer players tend to develop more strength in the quadriceps than in the hamstring. I’m most familiar with ACL, PCL, LCL, MCL protection in terms of soccer, but this can be applied in other sports with a heavy emphasis on repeated movements using the psoas, abdominals, and quadriceps as primary movers (e.g., kicking, pedaling, sprinting, leg lifts and ab work). When the front of the leg is functionally stronger than the back of the leg, hyperextension is common.
Try these yoga poses to keep the hamstring engaged even when it is stretching. Even if you are not hypermobile in the hamstrings, you can benefit from strengthening this muscle group and learning not to lock out the knee.
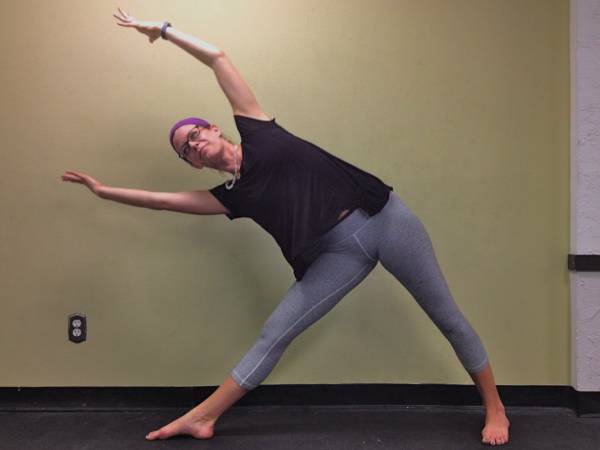
Triangle Pose with Arms Extended
Contraindications: Weak abdominals, pregnancy, low back injury. Modify for these conditions by stopping at step seven.
Instructions:
 Start in a wide leg stance with your feet a few inches narrower than your wing span.
- Turn the right toes straight forward and the left toes angled in about 45 to sixty degrees.
- Reach the right arm forward over the right leg, as if someone is pulling you, allowing the hips to hinge back slightly, aiming to keep the right leg as straight as possible without locking the knee.
- Place the right hand on right shin, isometrically pressing the shin back into the hand.
- Sweep the left arm over the ear, palm turned down toward the ground.
- Press down through the right big toe, engaging the entire calf and lifting the hamstring and quadriceps as if you are trying to lift the knee cap.
- Engage and lift in the right rib cage.
- Once you feel buoyant enough to do so, lift the right arm to meet the left, as if you are holding a beach ball between the hands.
- Stay here, engaging the legs, core and lifting the right side of the body, for about five long breaths.
- Release back to triangle, and engage the legs to lift up.
- Switch sides.
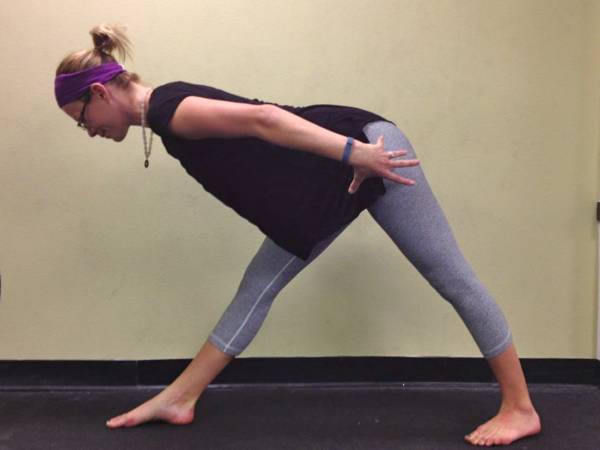
Pyramid Pose with Arms in Airplane
Contraindications: Weak abdominals, pregnancy, low back injury. Modify for these conditions by leaving the hands on the two blocks.
Instructions:
 Start standing with the feet hips width distance apart and a yoga block placed outside each foot.
- Keeping hips width distance in between the feet, step the left leg back about three to four feet (depending on your height and flexibility), turning the left toes out just a few degrees to ground the left heel and outside of the foot down
- Place the hands on the hips and square the hips and chest forward.
- Lengthen through the sides of the body, then hinge forward at the hips, aiming to keep the right leg as straight as possible without locking the knee.
- Pause half-way down, with the spine extended and trunk long, to lower the hands to your two blocks.
- Press down through the right big toe, engaging the entire calf and lifting the hamstring and quadriceps as if you are trying to lift the knee cap.
- Engage the belly and low back to lift the trunk away from your front thigh, maintaining a half-fold in the body and lengthening the spine.
- Press down through the right big toe, engage all of the muscles in the right leg, then begin to reach the arms off of the blocks, sweeping them back like airplane wings.
- Hold here, keeping the right leg engaged and the outer left heel grounded, for about five to ten long breaths
- Release the hands to the blocks, and engage the legs to lift up.
- Switch sides.
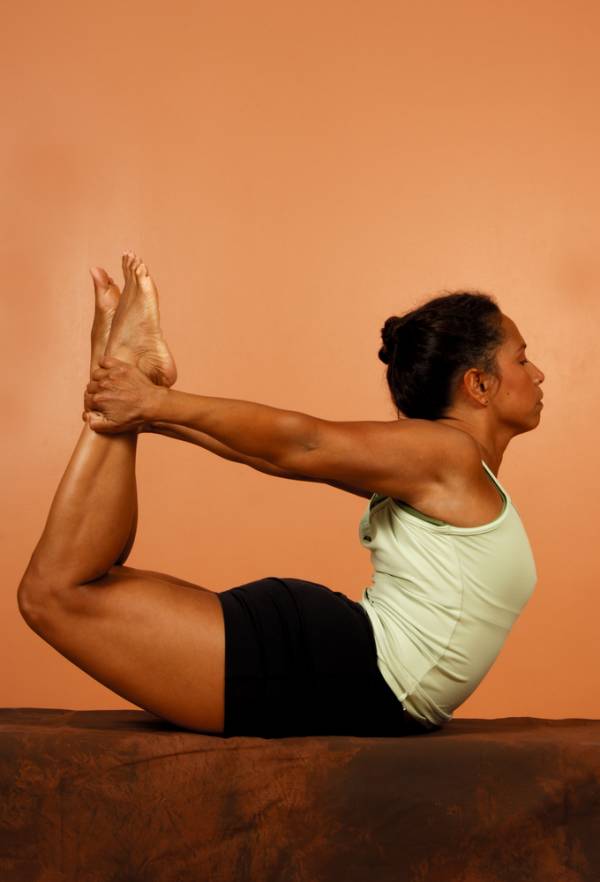
Bow Pose
Contraindications: Pregnancy, surgery to the internal organs. Avoid this pose all together in these conditions.
Instructions:
 Lie on the belly with the chin neutral.
- Bend the knees, keeping the knees no wider than the hips, and reach back to grab hold of your ankles or the outsides of your feet. If you cannot reach, simply interlace the hands behind the back and keep the legs straight for shalabhasana, yogi Superman.
- Kick the feet into the hands to lift the chest away from the mat.
- If you have a low back injury or sensitive low back, keep the quadriceps grounded on the mat. Otherwise, you may lift the legs as they kick into the hands.
- Once you have come as far as you can into the back bend, try to release your glutes. It will not be possible to do so entirely, but feel for a softening of the glutes and allow the hamstrings to become prime movers in this pose. You will feel your low back relax a bit once the glutes are relaxed.
- Hold for up to thirty breaths, rising a little on each inhale, softening on each exhale.
- Release slowly back down to the belly, letting go of the legs.
- Take up to five rounds, avoiding the urge to do any stretches in between rounds.
- After you have completed the posture, roll onto the back.
- Do not bring the knees into the chest. Instead, take a twist, allowing both knees to fall off to the right for several breaths then to the left for several breaths.
- Follow with a hamstring or hip stretch to fully release the low back.
In the first two poses, we are learning to use the hamstrings to keep the back of the knee soft. In the back bend, we are learning to prioritize the hamstrings over the glutes as primary movers. This allows the low back to release a bit more, keeping it longer, and gives the muscle group that tends to be functionally weaker a chance to strengthen.
If you know you hyperextend your knees, try taking these first two variations in yoga class whenever a teacher offers triangle or pyramid pose. Incorporate active back bends – these are back bends in which the body is working hard to sustain the pose – into your mobility or strength regimen, using the hamstrings over the glutes to get stronger in this muscle group.
Photos 2&3 courtesy of Bethany Eanes.
Photo 1&4 courtesy of Shutterstock.


