When someone new watches me demonstrate an arm balance, he or she often responds with, “I don’t think I have the upper body strength for that.” Well, I don’t either. There are some strong athletes who can muscle their way through most balances without proper alignment, but we regular people have to learn subtle alignment cues to find our way into balances.
One of my teachers says, “Each part of the body lifts itself.” This is the best advice for arm balancing I’ve ever received. You’re not resting the full weight of your body on your hands. Rather, you are lifting each part using alignment and musculature to take weight out of your arms and away from the mat. The good news? Learning alignment for arm balances helps you find alignment in every strength posture, including lifts, and reduces the chance of injury.
Try these alignment cues to get yourself into three fun balances:
1. Crow Pose (Bakasana)
Crow pose, also called bakasana, is like the gateway drug to arm balancing. It’s probably the first one you ever tried, and it’s often the easiest to find. The tools we learn in crow pose help us in all other balances, so it’s good to stop and learn the pose correctly.
Follow these steps:
- Start in yogi squat. Draw your feel together under your body, heels touching, hands firmly grounded at shoulder-width distance apart.
- Rise on to your tiptoes, lifting your hips as high as possible in the air. This lift in the hips is key in getting lift in your balance.
- Draw the knees to the highest point you can reach on your upper arms, ideally around the top of the triceps. Place the knees partly on the arm and partly outside the arm, feeling like you are squeezing in on your arms, rather than just resting your knees there.
- Look forward, about six inches to a foot in front of your hands. This helps you keep your shoulders lifted, which is key if you do not want to fall on your face.
- Shift your energy forward until one foot comes off the ground. If this is as far as you can go, stay here for a few breaths, then reground the first foot and try again with the other foot.
- If you feel stable, continue shifting to draw the second foot off the ground.
- With both feet off the ground, continue to look forward, squeeze in on your arms with your knees, and maybe try to touch your feet together.
- Hold for five to twenty breaths.
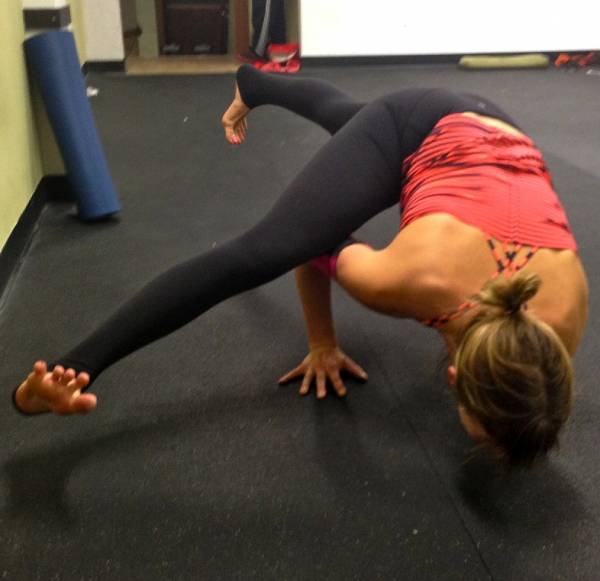
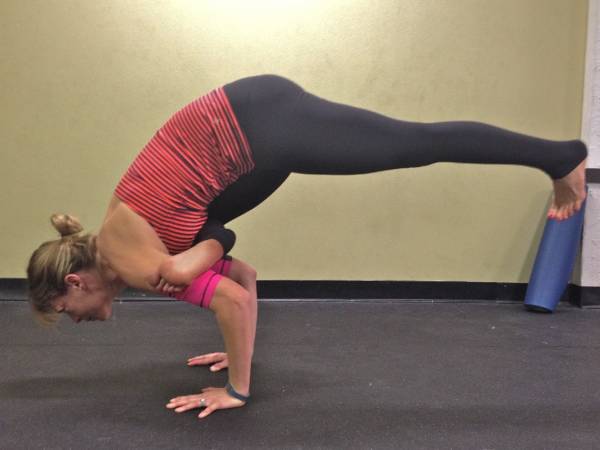
2. Flying Splits (Eka Pada Koundinyasana)
This pose requires open hamstrings. If you can’t quite straighten the front leg due to limitations in your hamstrings, you can leave the knee bent for single-legged crow (eka pada bakasana), but I personally find that variation more challenging since there is not as much counterbalance.

Try it out:
- Start in lizard pose. From down dog, step your right foot forward between your hands until your shin is vertical. You will be in a lunge with your hands grounded. Walk your right foot outside of your right hand, but hug in the right hip and shin toward your hand.
- Walk your right shoulder as far under your right leg as possible, essentially propping up the right leg with your triceps. You may stay right here and just work on opening the right hip.
- If you are able, begin to straighten the right leg at a diagonal from the top of your mat. Energize both legs. You may stay here and just work the position.
- Look forward. Hug your elbows in toward one another. When you are learning this pose, your left elbow can hug into your left rib cage so you are supported on two arms. If you feel comfortable doing so, you may let your rib cage float away from the left elbow so you are supported only by your right arm.
- Continue looking forward and shifting energy forward. As you do so, engage your core and psoas, and your left leg may just magically lift off the ground. If not, give it a little bunny hop. You may hover for a second, or you may find you can hold the pose in a controlled manner.
- Hold for five to twenty breaths. Repeat on the left side.
3. Flying Crow (Eka Pada Galavasana)
This is a big mamma arm balance. It primarily requires open hips, but it also relies on strength in the very base of the core and psoas to lift off the mat. Once you feel this pose in its fullest expression, you will delight in choosing it as an option during class.

Follow these steps:
- Start standing. Cross your right ankle over your left knee like a figure four.
- Flexing your right foot, begin to sit the hips back to your own ability, as if you are sitting back into a chair. This is called “Temple Dancer,” and you can stay here until you feel ready to move on.
- Continue to bend your standing leg deeply. Bend slightly at your waist in order to reach your fingertips to the floor in front of your right shin. Hold here if this is where you feel limited. This is a great pose for opening your hip.
- If your palms are fully grounded, hook your right foot into your left armpit. This brings your right shin high on your triceps.
- Press the shin into the triceps, look forward, and lift your waist off of your right thigh. Keep the heads of your shoulders lifted away from the mat.
- Your left leg may begin to lift. It may remain bent at first as you feel what it is like to hover away from the mat in this pose.
- If you feel steady, begin to extend your left leg away from your body until it is straight. This requires much engagement in the deepest part of the core.
- Hover for five to twenty breaths. Repeat on the left side.
Arm balancing is a freeing way to find strength in any yoga class. You will find it easiest to arm balance when you are lightly open, but not too sweaty or fatigued. I’ve been digging Guroo Active’s arm sleeves made specifically for balancing to help me get into tricky poses when I’m sweaty. These bands (which I’m wearing in the photos) wick sweat and also have a small portion of grippy surface to make your triceps extra welcoming for thighs, knees and feet.
Have fun! And if you have questions or comments about your experiences with these balances, please post to the comments below.


