I love Turkish get ups, but most athletes and trainees I speak to hold a completely contrary sentiment. I’m not here to tell you that your training is incomplete without them, but I know of no better tool to force your entire body to work as one cohesive piece. Smoothly performing a heavy Turkish get up requires high-level strength, coordination, balance, engagement, focus, awareness, and mobility. The training effect from this single movement knows no equal.
Glorification over. Actionable advice to follow.
Get Past Your Get Up Issues
Among those who dislike the get up, most claim one or many of these common issues:
- “They hurt my wrist/arm.”
- “I don’t see the point.”
- “They aren’t fun.”
- “I can’t do very much weight.”
- “They’re too confusing.”
All of these can be corrected by emphasizing a few simple details. Most people claim to not enjoy get ups because they do not understand the training effect or remain unable to perform them well. Today I am going to demystify the movement and explain the benefits. I will also give you the tools to move forward, so that you can come to value and enjoy Turkish get ups as much as I do.
Breakthroughs with the get up come quickly, often in a single training session, when we emphasize the following two areas: overhead stability and the movement path.
Overhead Stability Optimal Engagement and Control: Get a Grip
Your grip does much more than keep the kettlebell (or other weight) in your hand. Bear down on the handle to fully engage your arm and shoulder. Be sure that you squeeze with your whole hand and all of your fingers. Think of each finger as a switch that engages a different part of your arm and shoulder. A common grip fault is holding the kettlebell toward the corner of the horns with the handle running diagonally across the palm. When gripping this way, most fail to squeeze with their ring and pinkie fingers leaving a lot of engagement (i.e. stability) on the table.
Try an experiment to prove this concept: Make a tight fist using only your thumb, index, and middle fingers. Touch the outside of your forearm and note the lack of engagement. Now squeeze your fist with all five fingers and feel the outside of your forearm harden and engage.
This same phenomenon happens through your upper arms, deltoid, and posterior portions of your shoulder girdle. Without all five of your fingers engaged you cannot fully engage your hand, arm, shoulder, and even core. Turn all of your switches on.
Gripping the kettlebell in the corner of the handle does not provide optimal stability. However, you can stabilize moderately well from this position by pressing your outer two fingers into the handle as shown below.
Left: Full grip, center of handle; Right: Diagonal grip, squeezed outer fingers
Overhead Stability Optimal Engagement and Control: Learn Your Wrist Position
Your wrist, like your grip, acts as a trigger to switch on full engagement through your arms, shoulder, and core. The strongest engagement and stability comes from curling your fist toward your forearm ensuring that you first knuckle points straight up. This will feel like an extreme position for those accustomed to barbell training, but it ensures optimal stability for balancing a kettlebell in overhead lockout.

Left: bent grip, Middle: neutral grip (like barbell grip); Right: strong grip
We can perform a similar experiment to prove this concept. Make a fist (nice and tight because we know what a huge role our grip plays) and flex your biceps like you’re posing. Pull your knuckles back pushing the heel of your hand forward and notice how difficult full engagement of your arms feels. Now curl your wrist back in and feel the tension build. You can repeat the experiment and pay attention to engagement you can create in your core and even your butt.
Wrist position, like your fingers and grip, communicates to your nervous system how much strength you’re asking to use. A weak grip and bent wrist are compromised positions and offer a greater opportunity to injure yourself. Your nervous system seeks to preserve your body by not allowing you full access to your strength in these positions.
A strong grip and a straight wrist allow full engagement through your entire system, even down to your primary movers and stabilizers like your core and glutes. Put yourself in a position to fully engage and enjoy the stability and confidence that follow.
Overhead Stability Optimal Engagement and Control: Learn Your Shoulder Position
A final tool to find optimal stability is to calibrate your shoulder and arm position. The best way to determine your optimal position is simply to move through the entire range of options. Using a light weight kettlebell, set up on the ground as though you are about to begin a Turkish get up.
With your arm locked out, and with a strong grip and wrist angle, rotate the weight by twisting your arm as far as you can in each direction. Move slowly and test the limits of full pronation and supination. This will allow your body to feel the position from which it can create the most stability. This experiment will allow you subconsciously determine your optimal position.
Repeat this experiment with a light weight at every phase of the Turkish get up. Pause at each position and slowly twist back and forth five times. Your body will develop an innate, proprioceptive sense of how best to stabilize for the entire range of motion.
The Turkish get up is best viewed as a sequence of postures. Each phase creates a solid structure to support the weight. We can simplify the movement and decrease mistakes by following cues from the previous position. Each step builds on the last, so missing an early step can result in a cascade of improper positions. We can also use this to our advantage by allowing cues from the preceding step to guide us forward.
The following section assumes a basic understanding of Turkish get ups. I will briefly discuss each phase to highlight the body markers that you can aim for to ensure proper position. For a more detailed tutorial on the basics of the movement, check out Movement Medicine: Breaking Down The Turkish Get Up.
Overhead Stability Movement Path: The Breakdown of the Turkish Get Up
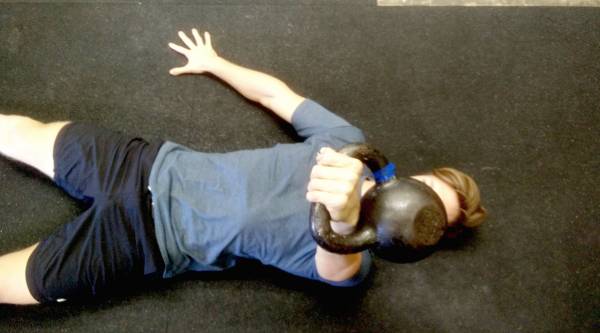
1. Begin with your legs out at a comfortable, but not excessively wide angle.
Body Cues: Your flat arm should be roughly parallel to your leg with your hand in line with your hips.

Start position
2. Roll to your shoulder first, then to pull to your elbow. This should feel like you are pulling out a drawer. Press up to your hand.
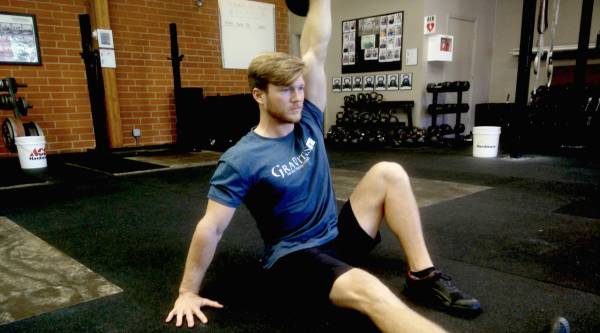
Body Cues: Your hand should not move except for rotation and is still in line with your hips.

Sitting tall, with hand at hip
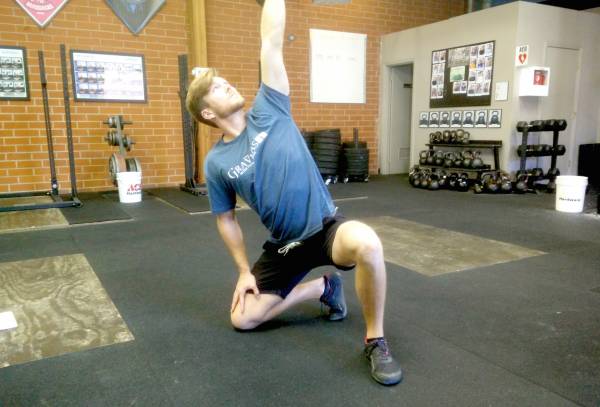
3. Lift your hips and sweep your leg through to a half kneeling position.
Body Cues: Knee next to your hand. Foot under your butt, in-line with planted foot. Imagine a box on the floor created by your feet and knee, one corner missing.

Box position
4. Rise into a lunge, unwind the back leg, and stand on the front foot.
5. Step back and lower to lunge position.
Body Cues: Remember to create the box. Step wide to drop the knee to the opposite corner of the box from your front foot. No walking the tight rope.
6. Windshield-wiper your foot under your butt to complete the box.
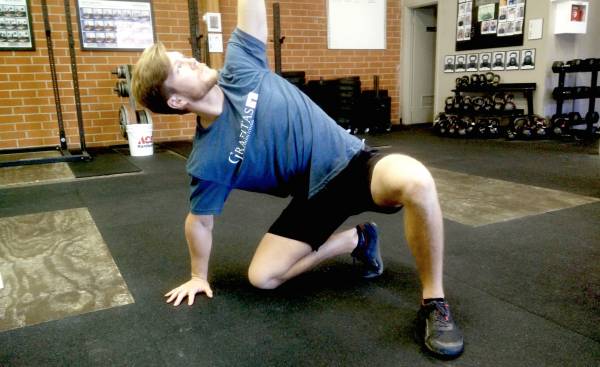
7. Sit your hips back over your foot as you slide your hand down your thigh.
Body Cues: Your hand should find the ground next to your knee.

Sit and slide
8. Sweep leg back out in front and return to tall sitting position.
Body Cues: Place your butt cheek into the spot that your knee just left.
9. Lower to you elbow first, then the same side shoulder. Finally, roll the other shoulder down flat.
10. Return the weight to the ground safely using both hands.
By following this process, you ensure solid structure at each phase and eliminate the guesswork by allowing each position to show you where to move next. Resist the temptation to skip steps. Get to know all the positions and cues above by pausing at each phase. Then, work to move through them fluidly.
Overhead Stability Movement Path: Hone Your Turkish Get Up
The following strategies will take your Turkish get up to the next level:
Static Holds: Pause in each phase for an extended hold. Holding for 10 seconds in each position on the way up and down can be a humbling experience even with a light weight. For an additional challenge, perform the arm rotation calibration (from above) or a set of presses in each position.
“Build a Get-Up” Game: This game goes through all the steps add-on style. Begin in the start position, roll to you shoulder, then return to the beginning. Next, move to your elbow, then return. Next, get to sitting and return. Stop and return at each phase until you have performed the entire movement.
Drill Each Step: Repeat each transition from on step the next, back and forth. For example, start in the seated position, sweep the leg through to half kneeling, then sweep back to sitting. Repeat this transition for reps.
Bottoms-Up Get Ups: Perform Turkish get ups (or any of the previous challenges) with the kettlebell bottoms-up. Nothing will challenge your stability and fluidity like working bottoms-up.
Overhead Stability Movement Path: Learn to Move Better
These tools will help you move forward with heavier weight and greater proficiency. Many of my athletes and trainees who have professed to hate get ups are simply frustrated or confused. Use these strategies to create a strong and stable overhead position and deepen the groove through the optimal movement path. Once you have, you’ll be able to share in the fun of standing up with a super heavy weight over your head.
More on kettlebell training: Sizing Up: How and When to Increase Your Kettlebell Weight
All photos courtesy of Justin Lind.


