“Well, that sucked.” My client un-racked the kettlebells and put them on the ground, still contemplating how in the world he got crushed by such little weight (comparatively speaking of course).
Here I was taking this guy who considered himself to be pretty strong (and to his credit he was – he could do a mid-300lb front squat relatively easily), and putting him on the struggle-bus with a pair of 24kg kettlebells.
If you’ve spent any time in the gym whatsoever you know this feeling, and it isn’t fun. The two-kettlebell front squat is an exercise that elicits this response in a lot of people. In fact, it’s probably the best exercise you’re not doing right now. Whether your goal is to get stronger, move better, burn fat, or be more athletic, the two-kettlebell front squat has you covered.
Benefits of the Two-Kettlebell Front Squat
The two-kettlebell front squat (2KB FS) should make its way into your program for a host of reasons, but here’s short list to get you started.
Lower Body Strength
You’ll never be able to load a 2KB FS at like you do a traditional front squat with a barbell, but that doesn’t mean it won’t help you get strong. Granted, the barbell front squat is superior if we’re talking pure lower-body strength, but the increased instability of the kettlebells makes up for the lack of load. In fact, most people feel like a rock when they return to the barbell after a cycle with the kettlebells.
Core Stability
I have yet to meet a single person who has enough core strength and stability. Or maybe I should say too much core strength and stability. By loading the kettlebells anteriorly you put your core on overdrive and force it to maintain position. Not only that, this movement will take your lats of the equation and force you to stabilize without them. A lot of people get into trouble because they lack stability from the right places, and this exercise helps correct that.
Grooving the Pattern
A squat, in its truest essence, is a straight-up-and-down movement. Sitting your butt straight down, staying in your heels, and coming straight back up. The placement of the kettlebells and the increased recruitment of your core makes this one of the best variations to work on grooving this up-and-down pattern. And for my anatomy friends out there, that means getting your outlet to open in the bottom position.
Breathing Into Your Back
Many people lack the ability to fill up their posterior mediastinum bilaterally when they breathe. By putting them in the bottom of a squat and biasing a little flexion, I can work on breathing properly and getting air into both chest walls (it’s a little more complicated than that, but you get the picture).
How to Do the Two-Kettlebell Front Squat
Clean the Kettlebells Up – Hopefully step one is fairly obvious. You have to get the kettlebells to the rack position if you hope to do this exercise.
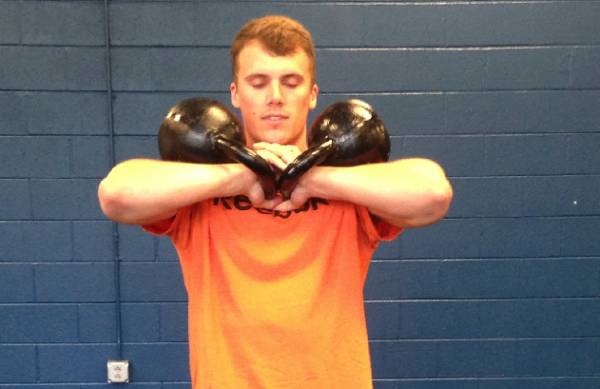
Set the Rack Position – Now that the kettlebells are up, you need let them rest on your forearms, biceps, and shoulder with a neutral wrist position. Then interlock your fingers and you’re good to go.
Set Your Feet – This could easily be step one, but most people need a little bit of a wider base to clean the kettlebells up. Either way, I want your feet shoulder width apart, and toes straight ahead or turned out five to ten degrees.
Get “Neutral” – Go ahead and exhale, bringing your ribs down and hips underneath you. If you do it right, you should feel your abs and hamstrings turn on. If you don’t feel your hamstrings, then think about digging your heels into the ground as you exhale.
Sit Down – As opposed to sitting back, which you would do in other squat variations, you’re going to sit straight down, making sure you stay in your heels and keep your hips underneath you the whole time. It’s important to mention that doesn’t mean let your toes come up off the ground. I want those down, too. It just means to feel your heels in the ground as you squat. Also, it may help if you think about using your hamstrings to pull yourself straight down.
Breathe – Now that you’re in the bottom position, stay tight. And don’t be in a rush to leave. Take a big breath in (remember the breath into your back piece) and on your exhale you’re going to start standing up.
Press the Ground Away – On your exhale, start pressing the ground away through your heels (especially the left – more on that later) to stand up. Be sure to keep your hips underneath you and don’t let them fly out (aka the stripper squat).
Finish – Continue pressing the ground away until you reach the top of the lift and finish in the same neutral position you started in.
Possible Technique Flaws
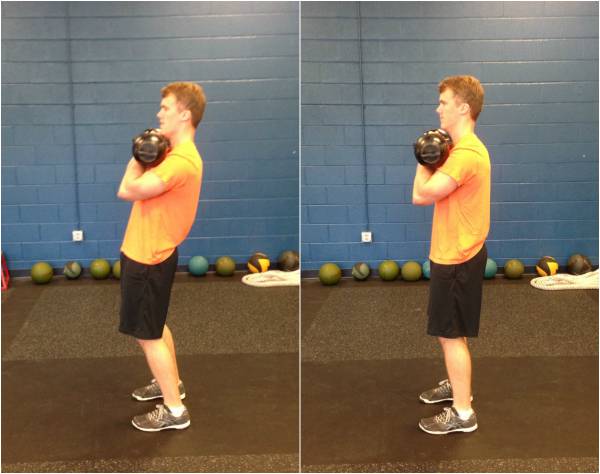
Broken Wrist Position – This is honestly incredibly uncomfortable, and will hurt your wrist. So don’t do it.

Left: Bad; Right: Good.
Elbow Flare – Again, not comfortable and a poor position for your shoulders to be in.

Hanging Out On Your Back – We want your core doing the work here. So don’t be lazy at the top and fall into your lumbar for support.

Left: Bad; Right: Good.
Losing Your Hip Tuck – Don’t lose your hip position on the way down. We want motion coming from your hips and the opening of your pelvic floor, not from your low back.
Drifting to the Right – We’re all susceptible to like the back of our right hip more than our left, so be cautious of this while you squat. A great cue for people struggling with this is to think about finding the inside of their right foot and their left heel throughout the range of motion.
Stripper Squat – The hips should stay underneath you, so keep them under control for the time being.
Head Flying Back – Keep a neutral head position the entire time, so don’t go gazing off into the stars.
Not Finishing – Don’t be that guy or girl. Finish your squats and lockout at the top.
Modifications
There’s a good chance you may experience the following: about half way to three-quarters of the way down, you feel like you run into a wall. Believe me, you’ll know what I’m talking about. At this point in time you have a few options:
- New Cues: Having someone check out your lift and cue you differently can make a big difference.
- Elevate Your Heels: A small heel lift often does wonders for people struggling to get depth in the squat. Granted, over time I’d like to see the heel lift go away, but in the short run it’s 100% an option.
- Pick a Different Squat Variation: You just may not be ready to take on this squat yet. It’s okay. You need to regress to a better option until you give yourself the capacity to be successful.
Programming
We’ve covered just about everything you’d want to know about the 2KB FS. The only thing left to do is to talk programming.
I’m a huge fan of this exercise for beginners, experienced lifters looking for a deload or movement cycle, athletes in the early off-season, and very extended people who need some movement retraining. Like I said earlier, this squat isn’t going to get you as strong as a traditional barbell squat. It’s more about solidifying good movement quality and developing a rock solid core.

When it comes to sets and reps, anything in the 3-5 set range with 8-12 reps is a safe bet. I also like doing these at the beginning of a workout and super-setting them with some form of a corrective. For example, maybe you have poor ankle dorsiflexion and would benefit from doing some knee breaks in-between sets. Or maybe you struggle finding the back of your left hip, so I’d attack that in your downtime.
Either way, the whole idea is to grant you access to a range of motion you aren’t that familiar with, so you can solidify it during the strength movement. Once this squat looks rock solid, I feel great about the option of putting a barbell in someone’s hands and having them crush a front squat.
Closing Thoughts
There are few things in this industry that are inherently good or bad. It always depends on the person, their goals, and how they move. The two-kettlebell front squat is just another tool to throw in your toolbox. But it’s a tool that helps solidify good movement, builds lower-body strength, and locks up an unstable core.
If you have any questions I’d love to hear from you, so drop me a line in the comments below and then go get after it.
Photo 1 courtesy of Read Performance Training.
Final photo courtesy ofShutterstock.


