Push ups – the purest, most powerful tool in your training arsenal. That is, provided you know how to use it! In this article, I’m going to show you:
Push ups – the purest, most powerful tool in your training arsenal. That is, provided you know how to use it! In this article, I’m going to show you:
- Why the way you’re currently doing push ups sucks and then give you three small form adjustments that make for big improvements – like more muscular recruitment and less unwanted joint stress.
- My top five push up variations (you may not have seen) that you can immediately use to add a new movement challenge to your workouts and take your push up training to the next level.
Related: The Best Chest Workouts for Muscle Mass, Strength, and More
Three Common Push Up Mistakes and the Quick Fixes
Put simply, there’s doing push ups, and then there’s doing push ups well. Now, you already know that sagging your head or hips toward the floor is a mistake, which is why I have not included it on this list. Aside from that obvious one, here are the three most common push up technique mistakes I see plenty of athletes and even fitness trainers making. I’m also going to give the quick fixes you can use right now to make your push up safer, more efficient, and much more effective
Common Mistake #1 – Arm Angle
Put simply, the longer the lever arm, the less leverage you have, and the shorter the lever arm, the more leverage you have. When applying this to the push up, in order to maximize your ability to create force and get better leverage on each rep, keep your elbows closer to your body instead of flaring them out at a 90-degree angle, which is typical for how most people do push ups.
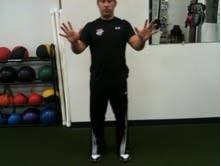
Left: wrong; Right: correct.
The Quick Fix: Keep your elbows closer to your sides at roughly a 20- to 40-degree angle from your body. This shortens the lever arm, which gives you an immediate mechanical advantage when doing push ups.
Common Mistake #2 – Elbow Positioning
When done well, the push up strengthens the entire upper body pushing musculature, including the chest, shoulders, and triceps. However, many people allow their elbows to move past their wrists, either behind or out to the side of the wrists. This not only places unwanted stress through the elbow joint (which elevates risk of an overuse injury at the elbows), it also makes the push up less effective because it reduces the chest and shoulder involvement, and makes it more of a triceps-dominant movement.
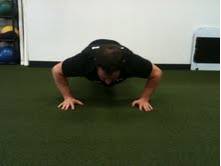
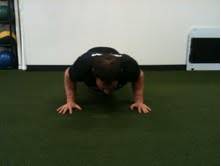
Left: wrong; Right: correct.
The Quick Fix: Keep your elbows above your wrists through the entire push up action. Your elbows should form a 90-degree angle at the bottom position of the push up.
Common Mistake #3 – Hand Positioning
If your hands are pointed slightly inward, as is often the case in how many people perform push ups, it usually encourages people to flare their arms out away from their sides, which is the issue we covered in mistake number one. Not to mention, pointing your hands inward also forces for your elbows to move out beyond your wrists in the manner I just addressed in mistake number two. In short, better hand placement encourages better elbow alignment and shoulder positioning.
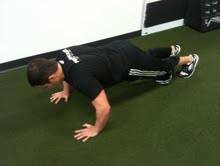
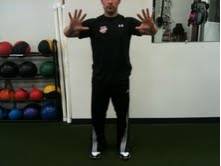
Above: wrong.
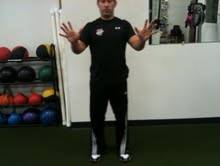
Above: correct.
The Quick Fix: Turn your hands outward slightly, pointing your fingers outward, away from the middle of your body at roughly a 45-degree angle. Doing this will help keep your elbows and arm in a better position for maximizing strength and minimizing unwanted joint stress.
If you’re still unsure that you’re accurately picking up what I’m putting down or would like to see these push up tips in action, then check out this video:
Top 5 Push Up Variations
The beauty of the push up is that it’s one of the most versatile exercises you can do. There are literally endless variations you could try, which can make it confusing when deciding which to use. So, to help narrow the field for you, I’ve provided a list of my top five battle-tested push up variations. These are the five used most often in my Performance U training approach. They make the push up more challenging and add some new movement to training programs in order to make sure clients and athletes consistently get stronger and have fun while doing it.
Note: The “home base” push up position (i.e. shoulders, elbows, hands, along with not allowing your head or hips to sag) I covered above is what we apply to all push up variations.
1. Push Back Push Up
This variation resembles the diagonal pushing action of an incline dumbbell press, so it focuses more on the shoulders. Not only have we found that the push back push up is a great way to strengthen your shoulders, but it also forces you to use your abdominals to remain stiff and strong when your arms are extended above you. This makes this move a nice core exercise, as well.
2. The Superman Push Up
When we’re looking to combine an advanced core stability challenge into the push up, we go to the Superman push up.
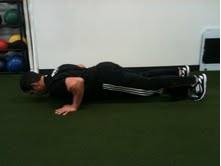
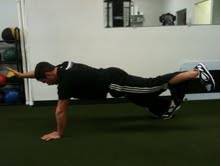
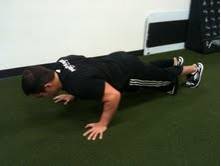
Set up: Assume the push up position with feet shoulder width apart.
Action: Drop into the bottom of the push up. As you rise to the top of the movement, lift your right arm out in front of your body, while simultaneously lifting your left leg off he floor so it’s in a straight line with your right arm. Pause at the top position for one second. That’s one rep. Drop back into the push up and repeat the same action on the other side.
Coaching Tips
- Do not allow your torso to rotate at the top.
- Keep your torso straight throughout the movement. Do not allow your hips or head to sag toward the floor at any point.
- Keep your legs straight through this movement and do not allow your knees to bend.
3. The Break-Dancer Push Up
This is a rotational version of the Superman push up. Although we do exercises for substance (i.e. for the training benefits they provide), the break-dancer push up is also a great way to impress the know-it-alls at your gym.
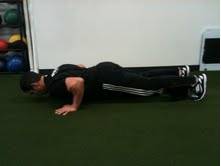
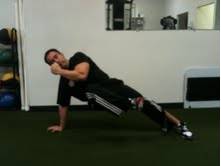
Set up: Assume the push up position with feet shoulder width apart.
Action: Perform a pushup and as you rise to the top, twist to your left side while you simultaneouslyraise your right knee to meet your left elbow. On the next rep, after you’ve dropped back into another push up, raise your left knee to your right elbow.
Coaching Tips
- While rotating your torso, move your hips and shoulders at the same rate. Do not roll your hips before your shoulders
- Bring your knee up to your elbow and keep your hand in front of your face. Don’t bring your hand down to meet your knee, as that’s a cheat.
- Keep your torso straight throughout the movement. Do not allow your hips to sag toward the floor at any point.
4. One Arm Push Ups
To me, the one arm push up is not only at the top of the push up food chain, it’s also the king of all upper-body pushing exercises. Yes, that means, unless you’re a powerlifter or training for a bench press combine test, if we had to choose between the bench or the one arm push ups, we’re going with the one arm push up all day long and twice on Sunday. No, I’m not saying the bench press is a bad exercise or that we don’t use it. How we program one arm push ups along with the bench press is something I’ve written about extensively in other articles. There’s no need to repeat myself here, so I’ll just say that although the one arm push up is not performed from standing, it can have a high transfer into standing pushing strength because it has a heavy involvement of the core, hips, and lower body to control body position, which are the factors involved when producing pushing forces from a standing position rather than when lying on a bench.
Plus, when performing one arm push ups, you’re not only promoting unilateral strength, you’re also training the serape effect, which is the force production relationship between your shoulder and opposite hip via the torso. This connection is responsible for actions like running, throwing, and punching.
As with the traditional push up, we’ve put lots of thought into maximizing the benefit from one arm push ups through specific technique cues. I discuss and demonstrate all of this in this video:
5. Triple Threat Push Up Protocol
This really isn’t a push up variation as much as it is a protocol using the basic push up. That said, it’s still a new twist on a classic move, which adds variety to how you use push ups. When we want to add volume to a workout, and create an insane muscle pump, which are both linked to increases in muscle hypertrophy, we’ll use one of the these two triple threat push up protocols. Also, we’ve used these triple threat push up protocols to help people achieve 100 push ups.
How it works: Both of these push up protocols are based on the triple drop-set concept. They both begin with the most difficult push up variation and progressively work down to the easiest version. We go for max reps (technical failure) on each push up.In other words, as you fatigue, the exercises become easier, allowing you to continue to crank out high-quality reps with less risk of injury.
Here’s how to perform the advanced push up triple threat:
If the addition of the extra weight plate (in the above video) was a bit too much for your ability, then no problem. This second version of the push up triple threat has your name all over it:
Recommended Reps, Sets and Push Up Workout Tips
- We usually choose one push up variation to perform per workout
- We usually perform 2-4 sets of a particular push up variation
- For those who can do one arm push ups, we’ll go for 4-5 sets x 2-5 reps per arm.
- For other push up variations, we like to do repetitive effort set up by doing as many reps as you can in good control.
- Rest 90sec-2min between sets. We’ll rest 2-3min between triple threat sets.
- If we’re doing a body part split type routine, we’ll perform push ups as part of an upper-body workout.
- Lower rep push ups (i.e. one arm push ups) are done earlier in a strength workout, whereas repetitive effort push ups variations and protocols are usually used toward the end of a strength workout.


