Today I want to introduce you to our first four-week training plan. It is specifically designed to achieve one of the most difficult, yet rewarding physical challenges: climbing on top of a horizontal bar.
Looking for the other weeks of the training plan?
<strong”>This is not your typical mechanistic muscle-isolation drill or upper-body strength workout done at the gym. It is a complex and adaptable movement that requires specific motor skill, strength, and mindfulness, and it will enable you to achieve a highly practical, real-life physical action.
Read on to learn about the movement and get the complete first week of training.
One bar, one body, one mind, one goal. Useful to the core.
Pop Up to the Top!
We will be employing a technique we at MovNat call the tuck pop up. There are other ways to achieve the same practical result – some easier, such as the sliding swing up, some more difficult, such as the muscle up. But the tuck pop up not only requires specific motor-skill, but also a great amount of specific strength. If I were to use an approximate ratio, I’d say it takes 20% technique and 80% strength to achieve the movement.
But technique and mindful movement are obviously not the sole elements required for success. Strength is crucial, and without it you won’t manage to get on top. I have designed this plan so you can learn key technical components of the movement, but also so you can progressively develop the specific strength required for this technique.
LEARN MORE: Why MovNat Benefits Athletes in All Sports
This is a general program that may not fully suit you, depending on your current level, physical ability, or rate of progress. Feel free to adapt the plan to your needs. It may take you longer than four weeks to succeed, or just a few days, maybe even less.
At the end of these four weeks of training, I will provide you with a tutorial video on key technical aspects of the tuck pop up that will help you practice your efficiency. Ultimately, your competence will be assessed in term of both effectiveness and efficiency.
- Effectiveness is your ability to successfully get on top of the bar, regardless of efficiency.
- Efficiency is your ability to doing it swiftly, smoothly, and safely.
Will you become capable of both? That’s the ultimate goal. Strength and power are essential for an effective pop up, but strength will only take you so far. Technique is essential for an efficient pop up, but technique will only take you so far.
Practical and adaptable physical competence demands a whole set of motor skills, strength, and other physical adaptations, mental qualities, and experience. That’s what Natural Movement is about.
Ready to take up the first Natural Movement challenge? How about filming yourself during some of your workouts or at the end of each week? Send us one single video showing your progression from start to the end, hopefully with a successful test at the end!
Needed for the Challenge
- Low wall: For the wall/feet assisted forearm hang, you will need a wall about four to six feet high.
- Horizontal bar: To practice the technique and drills you will need a horizontal bar. It can be made of metal or wood, but shouldn’t be too smooth and slippery so you get enough friction. For a beginner, the bar needs to be perfectly horizontal, sturdy, and stable (it shouldn’t bend, shake, or roll). The ideal thickness is four inches in diameter. Don’t use a regular pull-up bar, as it is too thin for a beginner – it will challenge your balance and bruise your forearms.
The bar should be placed at five or six feet high. Too low and your knees will touch the ground, too high and you may have trouble getting in the forearm hang position, plus it will be unsafe to the beginner. If the bar is higher than six feet, make sure you have someone to help you step down safely or there’s a cushy padding underneath you. You may use a box to step up to bar level and get into position, but make sure the box is placed just below the bar, not in front of it.
You may train using a flat surface at the beginning instead of a rounded bar, but bear in mind that in most real-world scenarios you will deal with rounded surfaces. It is easier to transition from a rounded to a flat surface than the other way around.
GO TO A SEMINAR: A Breath of Fresh Air – My Experience at a MovNat Workshop
You can find such “equipment” in parks or playgrounds, in nature, or at MovNat affiliate gyms. If you can’t find a suitable surface, you will have to set one up in your backyard or garage. You can screw it, or tie it up with rope or ratchet straps. If you do it yourself, make sure it is really reliable and won’t slip down unexpectedly.
For the weighted forearm pull up, you may use a weighed vest, a backpack, an iron plate chained to a strength belt, or simply squeeze something heavy between your legs.
To officially register for the challenge, invite your friends, and raise money for your favorite charity, click here and join us!
Tuck Pop Up Warm Up and Progression Drills Videos
- Dead hang
- Side swing hang
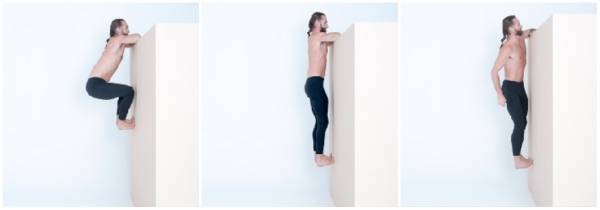
- Wall/feet assisted forearm hang
- Low forearm hang
- Low forearm hang side swing
- Single forearm hang switch
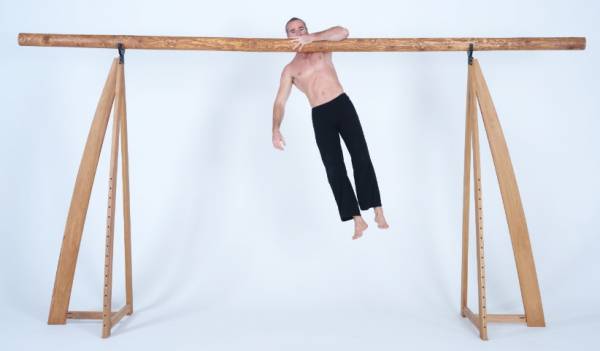
- Medium forearm hang bent knees
- High forearm hang bent knees
- Medium forearm hang knee tuck
- Medium to low forearm hang slow negative
- Medium forearm hang bent knee swing
- Medium forearm hang swing
- Low to medium forearm pull up
- Medium to high forearm pull up
- Low to high forearm pull up
- Weighted forearm pull up
Benefits, Technique, and Practice Tips for Each Drill
Dead Hang
This is a great way to stretch and improve mobility of the T-spine and shoulders, as well as feel and release potential tensions. Go for a thin bar if you’re a beginner so you can have a stronger grip. More advanced practitioners should hang on a thicker bar to increase grip strength needed for thicker hanging surfaces.
Vary grips and grip widths in different training sessions.
Side Swing Hangs
A playful movement that will stretch and improve mobility of the T-spine and shoulders, and also demand more grip strength and shoulder stability. Keep your body aligned and swing it linearly sideways by maintaining core stability and avoiding rotational motions from the hips.
Generate the swing motion from the core, not from your arms. As you increase the amplitude and speed of the sideways movement, your body will elevate more and allow you to release one hand for a brief moment. Keep in mind, this happens because of the lower body’s motion, not because you are actively pulling from the upper body.
Wall/Feet Assisted Forearm Hang
Holding this position will help you develop the back and abdominal static strength required for the active forearm hang, without it being as demanding. It is also a great specific warm up.
Forearm Low Hang
Contrary to appearances, this is not a “dead” hang but an active hang. Not as demanding in term of strength as the medium or high forearm hang, it is excellent for shoulder, T-spine, and scapula mobility. For optimum mobility gain, keep the forearms on the bar, not the insides of the arms.
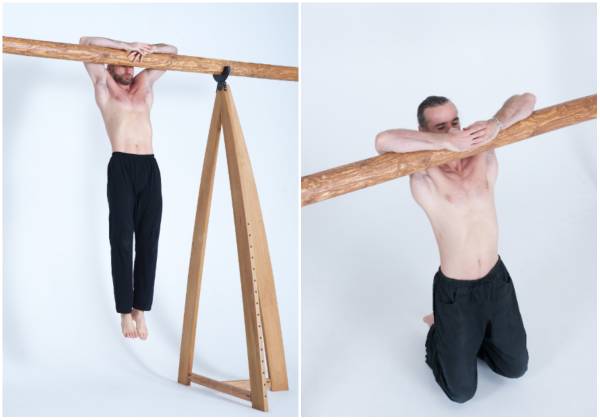
Low Forearm Hang Side Swing
The additional side swing will develop strength in your oblique abdominal muscles, but most importantly it will increase your balance and stability in the low hang position. This is the same side swing motion as in the previous drill, but now from a different position.
Single Forearm Hang Switch
If you can hang from one forearm, hanging from two is a piece of cake, right? An excellent additional drill that does wonders for shoulder mobility and stability. Can you switch smoothly from side to side?
Medium Forearm Hang Bent Knees
An active hang that requires and develops back static strength and stability, as well as some abdominal strength. Shoulders are raised at bar level, aligned with the forearms. While you may make it easier by placing the inside of your arms above the elbows on top of the bar (as opposed to your forearms), this is not a good habit.
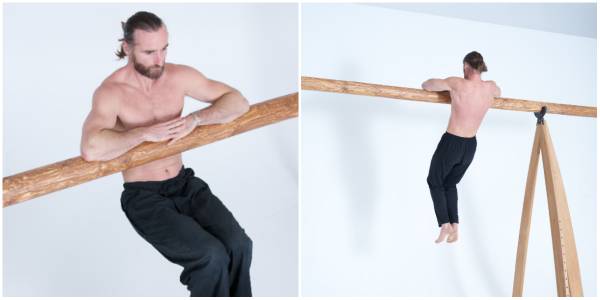
You must acquire the strength needed to hold this position on the forearms, so you can effectively perform the forearm pull up and eventually the pop up. The closer to the armpits that you hold the bar, the less range of motion and power you will be able to create during the pull, the less height you will reach, and the less balance you’ll have, as well. Bending your knees at a ninety-degree angle will help you with the knee tuck, which comes soon.
High Forearm Hang Bent Knees
This is the highest position you can hold before the actual pop up, and it requires more strength than lower hangs.
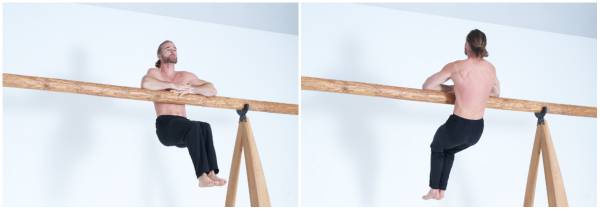
Medium Forearm Hang Knee Tuck
Similar to the medium forearm hang bent knees, but you lower your bent knees all the way down, and swiftly tuck them to chest level without rounding your back and/or challenging the stability of your hang. This drill will give you the strength and stability needed for the tuck during the pop up, which will support the forearm pull.
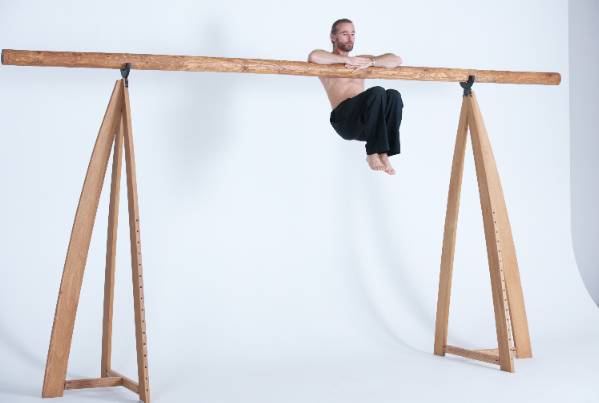
Medium to Low Forearm Hang Slow Negative
An eccentric drill that helps you develop the strength required to hold the medium forearm hang through a slow resist against gravity. Don’t be discouraged if you are going down quickly, just try to slow yourself as much as possible each time. If you do not yet possess the strength to pull yourself back to the medium forearm hang from the low position, just step back up into the medium hang.
Medium Forearm Hang Bent Knee Swing
This movement will improve the stability of your position in the forearm hang. It is only advised if you have enough strength to hold the medium forearm hang for at least ten seconds with a good forearm position and while keeping shoulders and forearms aligned. Keep your knees bent and drive the swinging motion from the hips. Only increase amplitude and speed of the motion if you can maintain the stability of your position.
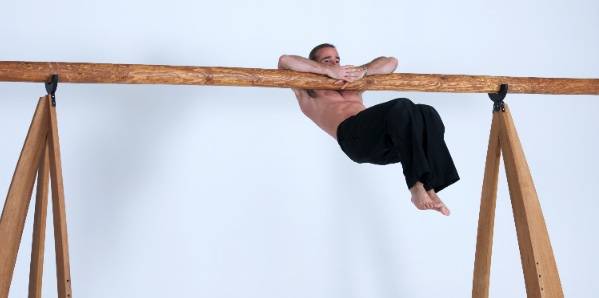
Low to Medium Forearm Pull Up
This is where serious strength gains begin. Aim for a straight pull, which means you only pull from the forearms and avoid assisting motions from the lower body (as in a knee tuck or hip swing).
Medium to High Forearm Pull Up
Staying strong at the end range of the forearm pull up motion is crucial. If you lose momentum, gravity will defeat you before you can perform the pop up. Practicing this segment of the movement will give you that strength – and give you confidence that you can maintain your momentum and pull the extra inches needed to get on top.
Low to High Forearm Pull Up
This is the greatest range of motion you will reach before the actual pop up. It demands an explosive pull from the low hang and the maintenance of speed all the way to the high hang. This movement demands and improves power, which is essential to succeeding at the pop up. You can practice it straight (no motion from the lower body) or initiate the pull with a swift knee tuck, which will improve your coordination and efficiency when doing the actual pop up.
Weighted Forearm Pull up
So you can do several forearm pull ups in a row? Great. You can try to do more reps per set, do more explosive reps, or improve strength and power by progressively loading your body and increasing resistance.
Additional Notes
- Breathe through the abdomen, not the chest. This is especially challenging, but also rewarding, when your abdominal muscles are strongly contracted. This will be most of the time with the drills above. Make them an opportunity to strengthen your diaphragm and abdominal breathing.
- This program has one single objective and will particularly challenge your back and abdominal muscles. You may rest between each drill or set, or transform the session into a “combo” (circuit) by doing different movements at low intensity (standing, kneeling, sitting transitions, balancing movements, slow running, etc.).
- If you’ve never done forearm hangs and pull ups before, you might get MovNat tattoos. These are temporary dark spots that look like bruises due to the unusual pressure and stress put on these particular body parts. You will find yourself supporting 100% of your bodyweight on the lower part of your forearms between your wrist and elbows, including holding static positions and sustaining dynamic motions, and that’s new to your body. Bruises are a small price to pay compared to the amount of strength, stability, mobility, and movement skill you will
Week One Training
Objective for the week:
Hold the active forearm hang for 10 seconds.
Day 1:
- Dead hang hold 10sec
- Side swing hang 10 swing (5x each side)
- Wall/feet assisted forearm hang 10sec x4
- Low forearm hang 10sec x4
- Medium forearm hang bent knees 4sec x4
- Low to medium forearm pull up x1 x5 as high as you can
- Medium to low forearm hang slow negative x1 (3-5sec) x5 with bent knees
Day 2:
- Dead hang hold 10sec
- Side swing hang 10 swing (5x each side)
- Wall/feet assisted forearm hang 10sec x4
- Low forearm hang 10sec x4
- Medium forearm hang bent knees 5sec x4
- Low to medium forearm pull up x1 x5 as high as you can
- Medium to low forearm hang slow negative x1 x5 with bent knees
Day 3:
- Dead hang hold 10sec
- Side swing hang 10 swing (5x each side)
- Wall/feet assisted forearm hang 10sec x4
- Low forearm hang 10sec x4
- Medium forearm hang bent knees 6sec x4
- Low to medium forearm pull up x1 x5 as high as you can
- Medium to low forearm hang slow negative x1 (3-5sec) x5 with bent knees
Day 4:
- Dead hang hold 10sec
- Side swing hang 20 swing (10x each side)
- Wall/feet assisted forearm hang 10sec x4
- Low forearm hang 10sec x4
- Medium forearm hang bent knees 7sec x4
- Low to medium forearm pull up x1 x5 as high as you can
- Medium to low forearm hang slow negative x1 (3-5sec) x5 with bent knees
Day 5:
- Dead hang hold 10sec
- Side swing hang 20 swing (10x each side)
- Wall/feet assisted forearm hang 8sec x4
- Low forearm hang 10sec x4
- Medium forearm hang bent knees 5sec x4
- Low to medium forearm pull up x1 x5 as high as you can
- Medium to low forearm hang slow negative x1 (3-5sec) x5 with bent knees
Day 6:
- Dead hang hold 10sec
- Side swing hang 20 swing (10x each side)
- Wall/feet assisted forearm hang 9sec x4
- Low forearm hang 10sec x4
- Medium forearm hang bent knees 5sec x4
- Low to medium forearm pull up x1 x5 as high as you can
- Medium to low forearm hang slow negative x1 (3-5sec) x5 with bent knees
Test of the week:
Hold the medium forearm hang bent knees for 10 seconds or longer.
For Week Two Training, Click Here
Photos courtesy of Erwan Le Corre from his book “The Practice Of Natural Movement.”


