As you may have read in my first article in this series, I am attending a program about mobility and movement at CrossFit 626 where I teach mobility myself. I am finding it interesting to see how the course work, based on the CrossFit Movement and Mobility certification, lines up with my knowledge as a yoga instructor.
This week’s session focused on overhead mobility, which I find is one of the toughest positions for strength athletes to achieve.
FURTHER READING:
Mobility and Movement, Session 1: Yoga and Self-Massage for Squats
Mobility and Movement, Session 2: Yoga and Mobility for Front Rack Flexibility
Along with working on external rotation of the shoulders and opening of the chest, rolling out around the shoulder blades can tremendously improve an athlete’s ability to draw the biceps behind the ears. Try these steps to rolling out and opening the shoulders before a workout requiring overhead positions:
Step 1: Establish a Baseline
Hold a yoga block between your hands at the medium distance. Reach the arms straight forward to begin, allowing the shoulders to round lightly and disengage from their sockets. Then, plug the shoulders firmly into their sockets and grip the block, feeling as if you’re trying to rip it into two.
This is external rotation of the shoulders. Keeping external rotation, begin to slowly lift the block above the head. Stop when you begin to stick out your ribs. If you have a mirror, take a glance at yourself from the side. This is where you are beginning.
WATCH A VIDEO: A Short Yoga Flow for a Better Overhead Squat
Step 2: Roll Out the Shoulder Blade Area
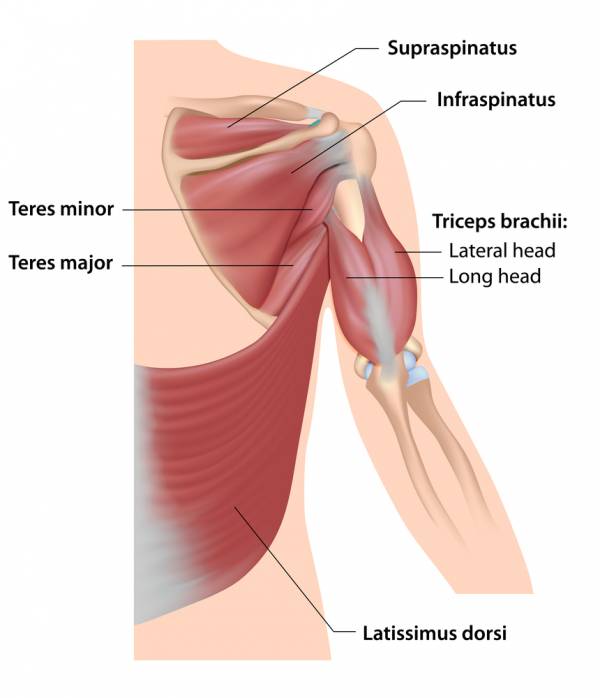
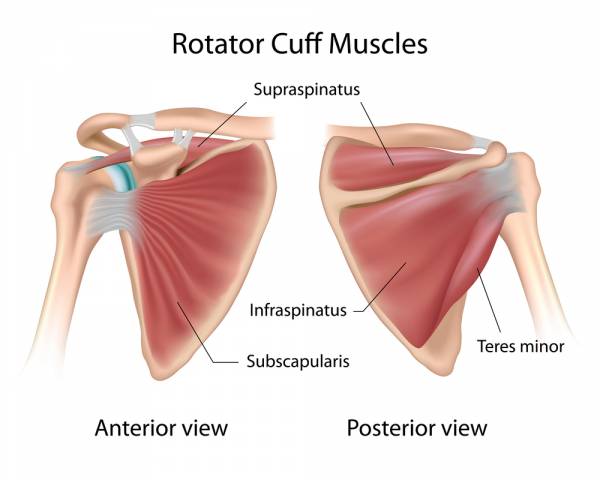
 Lie down on your back with two lacrosse balls or Yoga Tune Up balls nearby. Keep the knees bent, feet on the floor. Place a ball under each shoulder blade, just below the acromium bone (the knobby part that sticks out), on the infraspinatus.
Gently lift the hips to increase the pressure on the balls. Begin to move slowly up and down. The movement will be extremely subtle. You may not feel like you can move much at all.
If this is too intense, you can do this standing at a wall to decrease the pressure. It should feel uncomfortable but not necessarily painful. Roll out for at least two to five minutes in this position.
Keeping the balls where they are or adjusting them back into position as necessary, begin to roll with the grain of the muscle, side to side. You should feel more movement here. Roll as far out toward the arm and as far in toward the spine as you can each time. Roll out for at least two to five minutes in this position.
WHICH IS BEST? Yoga Tune Up Therapy Balls vs. Lacrosse Balls vs. Foam Rollers
Step 3: Stretch the Supraspinatus and the Trapezius
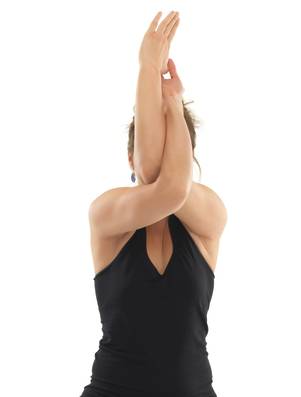
 Come to any seated position you can maintain for a few minutes, perhaps seated on a block or bolster. Sweep the arms wide, cross the right arm over the left, and reach for eagle arms by wrapping the forearms together and trying to touch your palms together.
If you cannot touch palms, touch back of hands. If you cannot do this, simply cross at your elbows and reach for opposite shoulders.
Inhale, lift the elbows as far up toward the sky as you can without sticking your ribs out. Exhale, pull down on the shoulders, engaging them into their sockets. You should already feel a stretch along the tops of the shoulders. Now, tuck your chin toward your biceps. Hold for ten to twenty breaths, then switch sides.
HIPS TIGHT, TOO? VIDEO – A Quick Chest, Shoulder, and Hip Opening Yoga Flow
Step 4: Open the Front of the Shoulders
 This one is a bit like the stretch you may have done in a doorway, stretching your arm behind you and opening your chest, but this version is on the floor.
Start lying on your stomach. Reach the right arm out to the side at a ninety-degree angle to your body. Use the left hand to push on the floor, turning your chest away from your right arm. You will immediately feel a stretch in the front of the right shoulder.
To maintain the position, you may wish to bend the left knee and place the sole of the left foot behind the right knee. If this is not enough, bend the right knee and place the sole of the right foot next to the left so both knees are bent, feet on the floor.
Keep your head grounded. Stop when you feel a strong stretch. You may place a soft lacrosse ball (one that is taped up to be more malleable) or Yoga Tune Up ball between your chest and the floor, but if this sensation is too intense, back off and just stretch the shoulder. Hold for ten to twenty breaths, then switch sides.
LEARN MORE (VIDEOS): 7 Exercises to Optimize Shoulder Health With Kettlebells
Step 5: Retest
Regrip the yoga block between your hands as before. Reach the arms straight forward to begin. Then, plug the shoulders firmly into their sockets; grip the block, and pull apart as if you’re trying to rip it into two. Begin to slowly lift the block above the head. Stop when you begin to stick out your ribs. Compare your overhead mobility to your starting position. Did it improve?
This simple mobility exercise set takes fifteen minutes at most. It is best performed before overhead lifting in order to open the body for the position. If you regularly take fifteen minutes for this throughout your week, though, you will get the benefits even without mobilizing before lifting. Remember, mobility takes discipline. You will see the greatest benefits through consistency. When the shoulders are able to achieve this position without losing external rotation, less strain is placed on the joint to achieve the position.
RELATED: Understanding the Shoulder and Bulletproofing It From Injury
Readers: Post photos in the comments showing your mobility before and after these exercises! Encourage your friends to take the steps toward greater shoulder mobility and fewer injuries.
Photos courtesy of Shutterstock.


