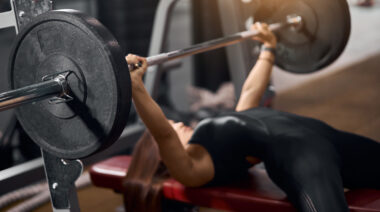
I get it. You want to be a total badass. You want to lift heavy stuff and be a super human who can do everything. I totally understand, because I’m the same way. But if you want to be a badass and lift heavy stuff, and continue to do this until you are eighty years old, you have to take care of the little things.
Think of it this way: If you were a NASCAR driver, would you race your car without first getting your tires aligned? Probably not. And then after racing your car, would you take the car right into your next race without first getting a tune up? Again, probably not. If you want your body to be a high-performing machine, you have to treat it like you would a high-performing car. Your body needs a tune up before and after you work out – especially if you want to be a superhuman as you get older.
Your Body Is Compensating for Poor Movement
In regards to alignment, your body can get “out of tune” in three specific ways: in the frontal plane, the sagittal plane, and the transverse plane. This is called compensation.
For the most part, you don’t feel your compensations, so you might not realize you have them. On the other hand, you do feel tightness and pain. Tightness and pain are the eventual breakdowns that ensue after you have been compensating for a long time. Over time, compensation leads to pain and injury, which, of course, gets in the way of being a badass.
It is a huge misconception that high-performance athletes are perfect and have no compensations. In fact, it’s quite the opposite. Most athletes are compensating a lot, and that’s what makes them so strong at what they do. It also makes them prone to injury. The secret to being superhuman for a long time is to minimize compensation as much as possible as you go along.
I took some pictures of a strong athlete who works out with good movement and form, but still has some pretty pronounced compensations. Check out these pictures to get an idea of what to look for with yourself or with your athletes if you are a coach:
Some compensations may seem small, but if left unchecked, they can become a big problem.
How Do You Reduce Compensation?
Now, the question is, what do you need to do to minimize these compensations so that you can continue to be a badass for a very long time? Keep in mind that most stretching, foam rolling, and lacrosse ball smashing exercises will not necessarily reduce compensation.
Below I have included two sample anti-compensation programs. Let’s go over some of the characteristics that make the two programs effective at putting your body into a better position and therefore making your body less prone to injury:
- Low demand. Low-demand exercises allow compensatory muscle patterns to be broken. As soon as you get up on your feet and start moving around, muscle memory will kick in and your compensations will prevail. Think of movements that involve laying on the floor, for example. The muscles of the shoulders, spine, and hips can relax when you are in this position, which allows the position of the body to change.
- Optimal joint positioning. Joint relationships and overall body positioning are key. You will notice in the exercise instructions I have provided that in each exercise, the position of the entire body matters, all the way down to the position of the hands and feet. In order for compensations to be reduced, postural changes need to happen throughout the entire body, not just one joint or one muscle. The absence of this factor is what causes most stretching and foam rolling routines to be ineffective at reducing compensation. Often times one part of the body is focused on or stretched when the rest of the body is not in a good position.
- Foot placement. Most of these exercises are done with the feet straight and hip-width apart. This one detail will make or break the effectiveness of these exercises.
Here is what straight, hip-width apart feet look like:
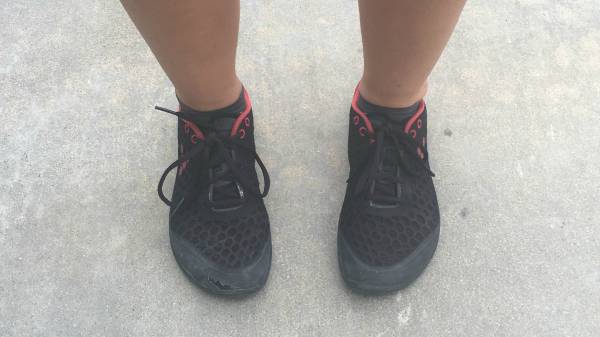
When the feet are straight, the outer edges of the feet are actually straight, not tapered out at an angle.
Here is what most people think straight feet look like:
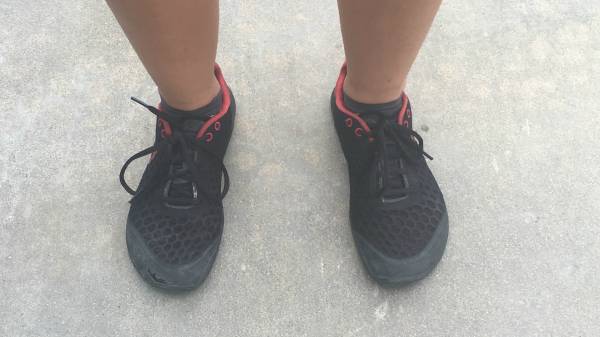
This is not straight. Note that the outer edges of the feet are angled out.
Tips for Success
Here are some tips to keep in mind when doing these or similar exercises:
Relax and focus. When you do an anti-compensation routine, your environment and state of mind matter. The goal is to change the way your body functions. If you just go through the motions without focusing on what you are doing (down to the way you are breathing and the position of your hands and feet), your body will just continue to cheat and nothing will change. You have to be able to relax, so put yourself into an environment where you feel comfortable and can focus. Breathe. Don’t hold your breath. I cannot emphasize this enough.
Increase your body awareness. The key word here is to increase your body awareness. Become aware of things you were not previously aware of while you do the exercises. For example, how does your body feel in relationship to the ground? Is one side heavier than the other? Are both feet straight, or is one foot turned out ten degrees more than the other? Noticing and changing these things will lead to change throughout the body.
Daily Anti-Compensation Routine
Here is a sample anti-compensation routine. Do these exercises in this particular order before and after your workout. Be sure to listen to your body, and skip anything that doesn’t feel right.
Daily Anti-Compensation Routine: Knee Squeeze
Purpose: Set your hips.
Method:
- Lie on your back with your knees bent and your feet flat on the floor pointed straight ahead (straight will look slightly pigeon toed).
- Put a hard object between your knees. A foam roller or yoga block works well.
- Place your arms out to your sides at a 45-degree angle with your palms facing up.
- Squeeze your knees into the hard object, hold it for a count of one, and then release.
- Keep your stomach muscles relaxed. You should feel the contractions in the inner thighs.
- Continue to repeat until you feel even on both sides of your inner thighs (40–80 reps).
- Make the squeezes smooth and slow, not jerky or fast. Keep your stomach relaxed and breathe.
Common Mistakes: Palms down and feet not in line with hips.
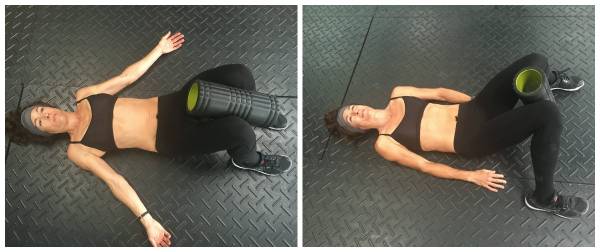
Left: Correct; Right: Incorrect.
Daily Anti-Compensation Routine: Pullovers
Purpose: Loosen up your shoulders and upper back.
Method:
- After finishing the knee squeezes, take a small break, then place the hard object between your knees again.
- Interlace your fingers above your chest. Keep your elbows straight throughout the exercise. Keep your shoulders on the floor. Place constant pressure on the hard object for the duration of the exercise.
- Keeping both arms straight, lower your arms to the floor above your head and then back up to the starting position. Do not force your arms to the floor. Go only as far behind your head as you are able.
- Continue until you notice that you begin to feel more limber in your shoulders, this will take about 20–30 reps.
- Be sure to keep your abdominals relaxed and breathe with each rep. Check in periodically to make sure you are still squeezing the object with even pressure on both sides.
Common Mistake: Bending the elbows.
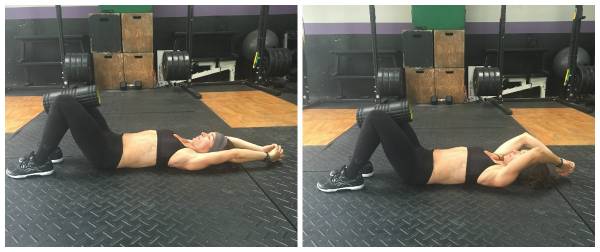
Left: Correct; Right: Incorrect.
Daily Anti-Compensation Routine: Kneeling Wall Clock
Purpose: Move your shoulders through a full range of motion.
Method:
- Kneel down facing a wall with your knees all the way up to the wall. The tops of your feet should be on the ground and your forehead and nose should be touching the wall. Keep your abs relaxed through the following three positions.
- Position 1: Raise your arms directly overhead and keep your shoulders relaxed. Relax your stomach to allow your pelvis to tilt forward. Curl your fingers toward your palms and stick your thumbs out. Rotate your thumbs/arms outward from the shoulder (moving the back of your hand toward the wall). Hold for 1 minute.
- Position 2: Move your hands down to 45 degrees. Repeat the outward rotation with your arms from the shoulders. Hold for 1 minute.
- Position 3: Move your arms down to 90 degrees (straight out from your shoulders, parallel to floor). Repeat the outward rotation with your arms from the shoulders. Hold for 1 minute.
Common Mistakes: Bending the elbows and/or holding the abs in tight.
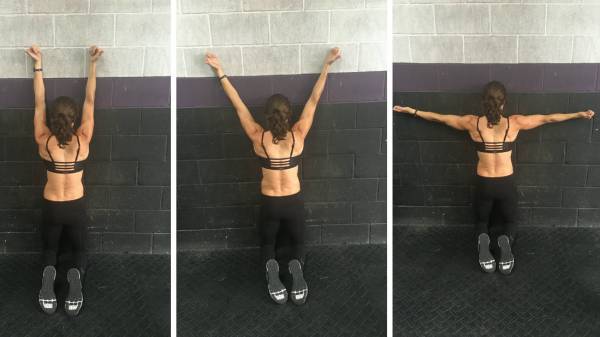
Left: Position 1; Middle: Position 2; Right: Position 3.
Continue for a weekly full-body unwind routine.
Weekly Full-Body Unwind Routine
Here is a sample full-body unwind routine to do at the end of a full week of training. Do these exercises in this particular order before and after you workout. Be sure to listen to your body, and skip anything that doesn’t feel right.
Weekly Full-Body Unwind Routine: Kneeling Groin Stretch
Purpose: Activate and balance your hips.
Method:
- From a kneeling position, place one foot out in front of you with your knee bent.
- Interlace your hands and place them on your front knee.
- Lunge forward. Keep the knee of the front leg directly above your ankle.
- Push into your hands to move your chest away from your knee. Your front leg should be supporting you as you are lunging forward. You should feel the stretch on the opposite/back leg.
- Hold for 1 minute on each side.
Remember full-body joint positioning. Check to make sure your hips are pointed straight ahead, and make sure that your feet are straight.
Common Mistakes: Jutting the knee over the ankle.
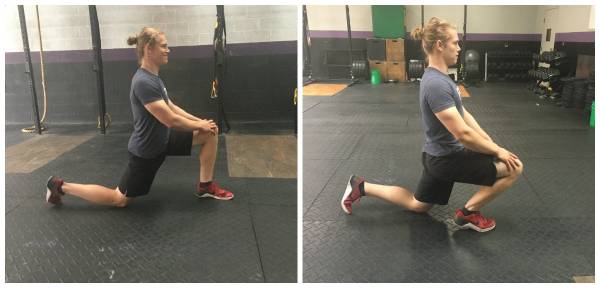
Left: Correct; Right: Incorrect.
Weekly Full-Body Unwind Routine: Active Groin Stretch
Purpose: Release your hips and shoulders.
Method:
- Lie on a table or countertop with your tailbone on the edge of the table. Your head should be flat on the table, in line with your spine.
- Clasp your hands around the thigh behind the left knee while the right leg drops completely. Be sure that your table or countertop is high enough that your foot does not touch the floor.
- Relax your shoulders and hold this stretch for 2 minutes on each side.
If your down leg flares out to the side, this means that your hip flexors are tight. If this happens, place a heavy object (such as your friend or a chair) on the side of your leg to keep it in line with your hip. Be sure to keep your hips, knees, and ankles aligned throughout the exercise.
Common Mistakes: Letting the knee flare out.
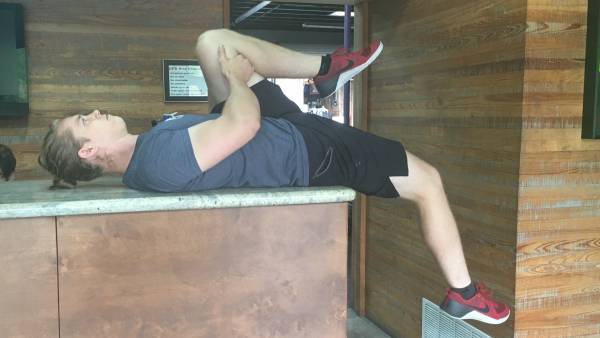
A correct position where the athlete does not let his right knee flare out.
Weekly Full-Body Unwind Routine: Frog
Purpose: Release your inner thighs and spine.
Method:
- Lie on your back with your arms at your sides, palms up and hands relaxed.
- Place the soles of your feet together.
- Center your feet along the mid-line of your body and let your knees relax down to the sides.
- Relax and breathe for 2 minutes.
Do not press your knees/legs to the ground. Just let gravity pull them down. You should feel a stretch along the inner thigh. Allow your low back to naturally arch up off the ground.
This is a great exercise to see if your hips are moving differently. If you look down at your knees during frog and one knee is sitting higher than the other, this is an indicator that your hips are not functioning the same way on both sides.
Common Mistakes: Being crooked.
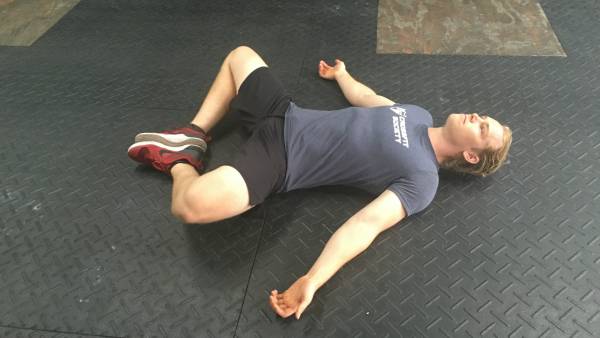
A correct position where the athlete’s hips and/or legs are not crooked.
Weekly Full-Body Unwind Routine: Supine Groin Stretch
Purpose: Total body release.
Method:
- Lie on your back with one leg straight out on the floor and the other leg on a block or a chair with the knee bent at 90 degrees.
- Place a heavy object on the outer edge of the down leg to prevent it from falling outward.
- Your arms should be out to your sides with your palms facing up and your upper body should be relaxed.
- Be sure to do this in a comfortable place where you are warm and relaxed.
Stay here until both of the following things happen, then switch sides and repeat on the opposite side:
- When you contract the thigh of the down leg, you feel the contraction towards the top of your thigh, closer to your hip than your knee. Re-test this thigh contraction every 5 minutes to see how you are progressing. Once you feel the contraction in the meaty part of your thigh closer to your hip, this means your quad has released.
- Your low back flattens to the floor. This means your hip flexor has released.
This will take you anywhere from 10–20 minutes on each side.
Common Mistakes: Letting the foot turn out.
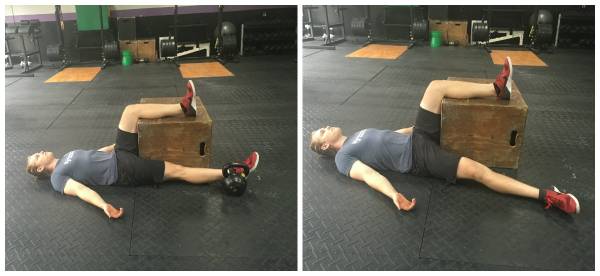
Left: Correct; Right: Incorrect.
Maintenance for Every Mile
Just remember, these maintenance routines are like taking your high-performing race car for an alignment before and after hitting the track. These sample programs on their own will not be enough to make you a total badass. You still need to practice your racing skills, but they will help to keep you performing at your top potential without breakdowns. Keep at it, and I will see you in the weight room when we are eighty.
Now Get Out of Your Chair and Try These:
Corrective Posture Exercises for Chronic Sitters
Coaches, Learn How to Put Movement First:
Move Well First: A New Path for Coaching Fitness
Headline photo courtesy of CrossFit Impulse.
In-line photos courtesy of Maryann Berry.


