What if I told you watching Bugs Bunny cartoons or playing FIFA 14 for hours a day can make you a better CrossFitter?
I’d be lying, of course. But if I told you that studying the principles behind what you’re watching on the screen could you make you a better CrossFit instructor, then I’d be telling you the truth.
Movement as Animation
Whether you’re watching Looney Tunes, a Pixar movie, or virtual soccer, it’s all animation. And as Greg Glassman wrote in the April 2004 CrossFit Journal, back in the early days of CrossFit:
We were convinced that animation could most powerfully and effectively depict the movements we were eager to share with the world… we still believe that animation would be the best medium for depicting movement, process, and cause and effect.
The process of animation begins with an animator carefully analyzing the movement to be depicted. He or she then breaks it down into its most extreme points of action – its key poses. These key poses are rendered, by hand or with computers, into a series of still images which, when playing at a rate greater than 25 frames per second, fool you into perceiving seamless motion. It’s really quite a trick, what Walt Disney called the illusion of life.
But these key poses must be correctly chosen and portrayed. If what we see on screen doesn’t match what we’ve observed of people and animals running, jumping, or falling, then the illusion of life is lost. It doesn’t take any training to recognize bad animation. It simply doesn’t look right.
Figure 1: Key poses of a jump and land.
To look right, the key poses must have the aesthetic qualities of energy, rhythm, and balance. For characters, this means bodies are depicted as assuming geometric shapes, rather than organic. Think arms and legs at sharply defined angles. And those are precisely the shapes the body assumes when it is moving most efficiently.
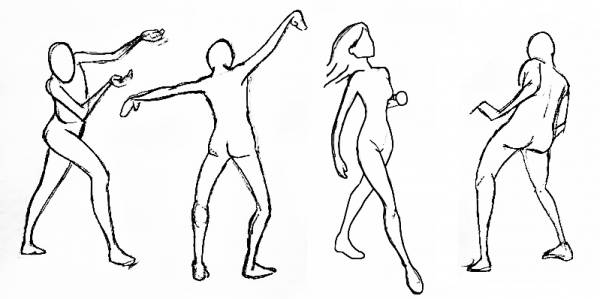 Figure 2: Dynamic poses in art.
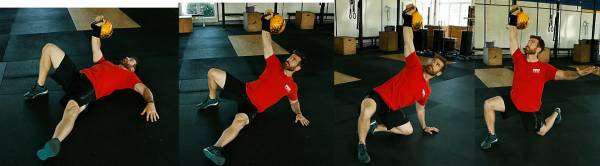 Figure 3: Dynamic poses in real life.
CrossFit by Numbers
So, if you haven’t guessed, before I was a gym owner, I worked as an animator in the videogame industry. This background, coupled with seven years of coaching experience, has led me to develop a system of instruction that applies the principles of animation to the teaching of CrossFit. We call it By the Numbers.
By the Numbers breaks down all the exercises CrossFit utilizes into a series of discrete, numbered positions. Exactly the same poses an animator would choose if he or she were to create an animation depicting that exercise. We teach and drill these positions one at a time, working slowly and carefully from static pose to static pose. Each pose must have its own energy, rhythm, and balance. Only when the poses have been mastered (or best approximated) do we have our trainees smooth them into the exercise as usually performed.
This confers five advantages:
- Working pose-to-pose improves athletes’ proprioception, as holding a pose gives them time to make sense of the relative positions of limbs and trunk.
- Holding poses aids in trainees’ forming muscle memory of proper positioning, expediting their progress from learning basic mechanics to being able to perform an exercise with consistently good form.
- Teaching poses allows corrections to be made real time, while the errors are occurring.
- Pose-to-pose is a powerful tool for instructing large groups, especially in complex movements like the clean or Turkish get-up.
- It standardizes instruction, so all of your trainees are getting the same information and cues, no matter who happens to be teaching.
In CrossFit, we strive for virtuosity. Virtuosic movement is beautiful movement. You could analyze film of a world-class athlete executing her event and at any point find energy, rhythm, and balance in her positioning. At my gym, the training cadre is striving to get every one of our athletes to hit aesthetically pleasing positions in every rep of a movement. And even if we’re working not with pencil and paper or 3D renders but nervous, headstrong, inflexible, eager, deconditioned, or clumsy individuals blessed with free will, we are animators willing them to be always in the right place at always the right time.
Is it a tall order? You bet. But it’s how we’re going to reach our goal: to have the best-moving general population gym in the world.
A Script for the Squat
By the Numbers works with everything: Turkish get ups, GHD sit ups, kipping pull ups, you name it. Here’s how it works with that most fundamental of movements, the air squat. Mindfully executed, even the plain old air squat can be a thing of beauty.
This is the basic script we use:
Set your heels shoulder width. Turn the toes out slightly. Screw your feet into the ground, right foot clockwise, left foot counter-clockwise, by contracting your quads and glutes. Brace your midline by squeezing your glutes and contracting the abs to lock your ribs to your pelvis, and setting the shoulder blades back and down. The position is the start and finish of every rep. We’ll refer to this as Air Squat 1, or just 1.
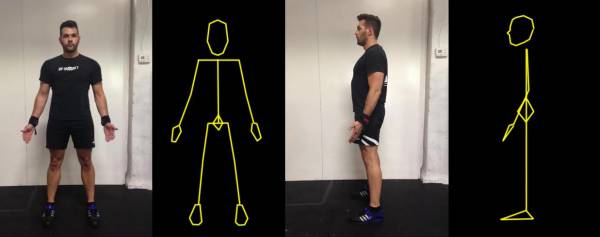 Figure 4: Air Squat 1.
Next, push your butt back, causing you to hinge at the hip. Make sure your shoulders and abs stay set; your torso should be a straight line from hip to shoulder. As you hinge back, push your knees out. Your knees bend, but do not come forward; shins stay vertical. You should feel tension in your posterior chain. This is Air Squat 2.
 Figure 5: Air Squat 2.
Finally, keeping your weight back on your heels, sit straight down until the crease of your hip is below the top of your knee. Push your knees out to track over your toes; keep thinking ‘screw in the feet’ or imagine spreading apart the floor between your feet. Keep your weight back toward the heel, and lift your hands as high as you can to help keep your torso upright. Keep your gaze neutral. This is Air Squat 3.
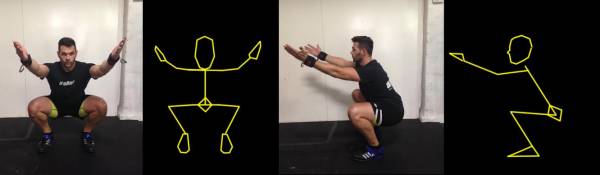 Figure 6: Air Squat 3.
Return to 2.
Return to 1.
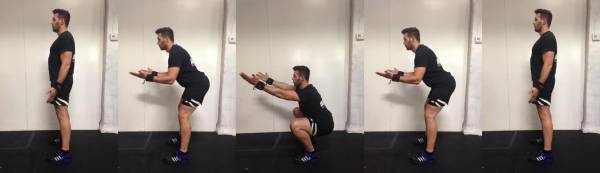 Figure 7: Full sequence: Air Squat 1-2-3-2-1.
Now comes the coaching. We begin by reviewing the poses one at a time. The pose number is called, and the athletes hold the position while the instructor makes her corrections. We encourage our instructors, through study and experience, to construct a mental model of what a perfect squat looks like – one that they can see so clearly that they can draw it correctly with simple stick figures.
In actual practice, the instructor imagines this idealized position superimposed on what he or she is observing, and adjusts the athlete until the abstract and the concrete match – sculpting, essentially. The process continues until the instructor is satisfied with the result. We encourage our instructors to take their time and get it right. This is art, after all (please read that as [semi] ironic).
Introducing Positional Drills
As noted earlier, this is a lot more effective than having the athletes execute a movement and trying to fix mistakes of position or load sequencing after the fact. Working pose-to-pose, instead of, “You broke at the knees too soon, so at the bottom of the squat your weight went to the balls of your feet, next time hinge back first,” it will be, “Show me Air Squat 2. Okay, in Air Squat 2 your hips are back, but your shins are still vertical, like this (makes adjustment). Now go back to 1. 2. Better. 1. 2. Okay, good.”
Now the athlete has a much clearer understanding of what went wrong, and thus much improved chances of doing it right the next time. All positional mistakes – knees turning in, weight on toes, loss of lumbar curve, etc. – can be fixed (or at least improved) at this point, using whatever you have in your trick bag in terms of visual, verbal, and tactile cues.
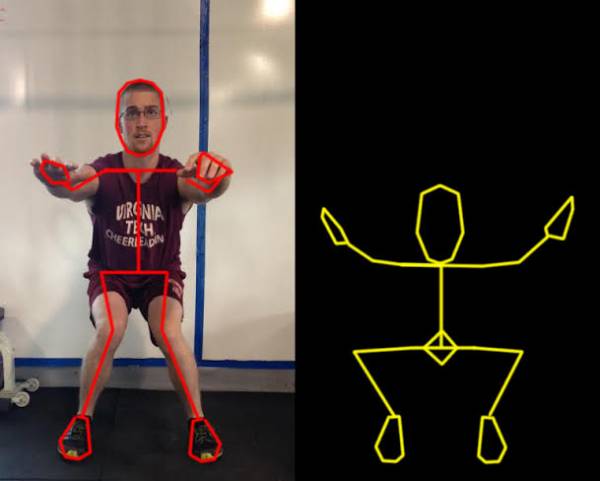
Figure 8: Valgus Knee Fault / Ideal Position 3.
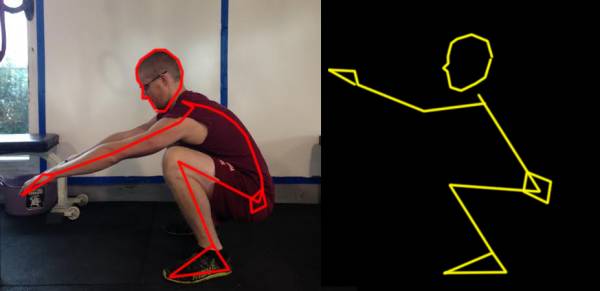
Figure 9: Loss of Lumbar Curve in Bottom / Ideal Position 3.
Once the athlete can, on command, hit all poses to standard, then it’s time to introduce positional drills. Positional drills are how we transition athletes from segmented, mechanical positional work to the full, smoothly executed movement. Positional drills are also the best way to address motor control or load sequencing issues.
A positional drill is simply a series of poses performed in sequence. For the air squat, we might do “3! Go!” Which in practice, works like this: “One. Two. Three. Go!” and on “Go!” the athlete moves at speed through Air Squat 2 back to Air Squat 1.
Or we might use, “2! Go!” In this one, the athlete is directed to hinge back into Air Squat 2, holding long enough for us to make sure he’s positioned correctly, and at “Go!” he sits down into 3, and then up through 2 into 1.
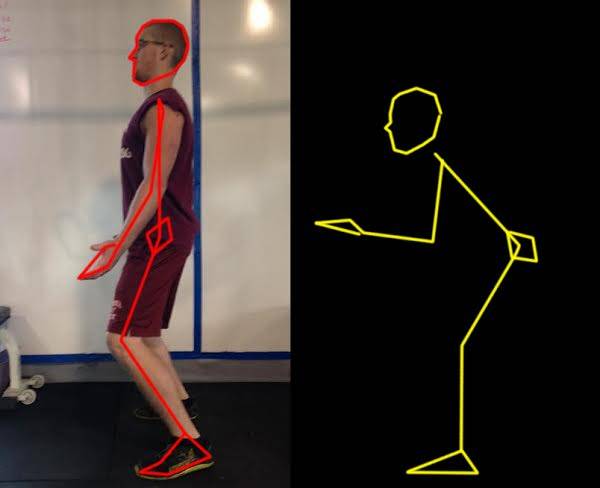
Figure 10: Squat Initiated With the Knee – Position 2 Fault.
As mentioned earlier, this approach makes teaching large groups a snap. By putting an example athlete at the head of the class and forming your trainees into ranks and columns, rather than the traditional circle, you can scan a couple dozen athletes at a glance, easily picking out those whose position does not conform to the ideal standard you’ve established and making corrections as necessary. Obviously many people initially aren’t capable of a beautiful squat. Experience and mercy will govern how much of a stickler you should be.

Positional Drills
A Simple System for New Athletes
All these steps to teach a simple movement like the squat might seem like overcomplicating things, but this careful, one-pose-at-a-time approach makes it a lot easier for new athletes to pick up more complex movements.
For instance, when learning the thruster, if the athlete understands that after moving from Thruster 1 (same initial pose as air squat, but with a bar racked on shoulders and held in a push press grip) through Thruster 2 to Thruster 3, he must stand up into Thruster 1 – knees and hips fully extended, bar still seated firmly on shoulders – before the bar goes overhead. This prevents the common error of pressing the bar off the shoulders before the squat is completed.
Next time, we’ll look at the way the “By the Numbers” system organizes movements into hierarchies of complexity, insists on the necessity of mastering one level before attempting the next, and how to teach a large group the muscle clean, pose to pose.