In my previous article I showed you how to get up and hold a handstand against the wall. In this article you’ll learn to take a much more advanced step by balancing out in the open.
In my previous article I showed you how to get up and hold a handstand against the wall. In this article you’ll learn to take a much more advanced step by balancing out in the open.
The skill required to balance in this manner is significantly higher. That being said, just about anyone who is willing to put in the work will be able to accomplish this goal in time. How long will it take? That depends entirely on how much you practice, as well as how you train it.
You can take the long route, and this is what most people do. It is what I did. After being bitten by the handstand bug, it became my goal to be able to kick up and confidently hold a handstand anywhere and anytime.
So I worked on doing exactly that. While I was ultimately successfully, this is the wrong approach to take. Let me tell you why: holding a handstand is a fine-motor movement that takes lots of practice.
Trying to do this without building a firm foundation is like entering the gym and trying to squat 500lbs on your first attempt.
It’s not going to happen. To get a good, strong squat, you would start with where you’re at, focus on building good form, and build from there. In time you could work up to that 500lb squat. But just starting there will doom you to frustration and failure (and possibly get you crushed). The handstand is much the same.
So instead of just jumping into the freestanding handstand itself, there is a much better path, using progressions we’re going to refer to as lead-up stunts.
What Is a Lead-up Stunt?
I originally discovered the concept of lead-up stunts from Professor Orlick, a professional hand balancer and teacher of many others. He outlined the idea in his book Hand Balancing Made Easy.
Orlick laid out a wide variety of stunts that focus on the skills you need to do a freestanding handstand, except you’re able to do them in pieces, broken down into a much easier manner.
This allows you to make progress faster, which then contributes to your abilities when you finally go onto the handstand.
I took all those drills he had and focused on just a few of them that delivered the biggest bang for you buck. This is the secret to developing a handstand faster than most people think is possible.
In fact, I’ve had students build up to a thirty-second freestanding handstand in just a few months, without spending hours a day practicing.
Stunt #1: The Wall Handstand
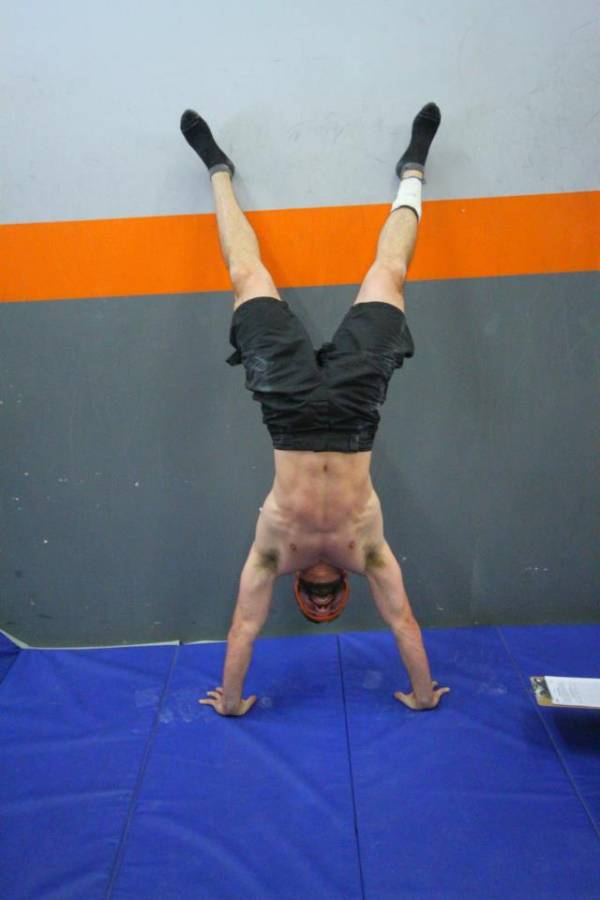
This was covered in the previous article. For that reason we won’t go into all the details, but the benefits of this drill are obvious as it helps you build your skill in holding the handstand position.

Since you don’t have to worry about balancing when the wall supports you, you can focus on getting your hands, arms, body, legs and head all in the right place.
Further, the wall handstand will allow you to build endurance in holding handstands. If you get tired after just five minutes of handstand practice, that won’t leave you with much practice time. But if you build your body to be able to handle more, you can get more practice in.
Stunt #2: The Frog Stand
The frog stand is known by a variety of names. In yoga, it is called the crow stand. I’ve also seen it described as the gargoyle. The name isn’t all that important. What is important is that this move allows you to work on balancing with your hands just like in a handstand.
The useful thing about it is that your body is close to the ground, creating a low center of gravity, which makes balancing much easier to do. This way you can build up the hand manipulation skill needed to balance, which later will help your handstand.
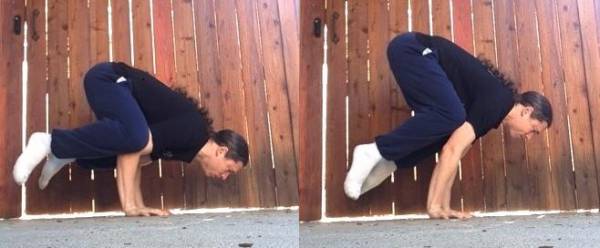
There are two main forms of the frog stand. One of them has the elbows bent. To do this you squat down on the ground placing your hands flat on the ground about shoulder width or slightly wider. Your knees will rest on the outsides of the bent elbows. Tip your weight forward until you can take your full weight onto your hands.
The other variation, more common in yoga, involves keeping the elbows locked out. Some will find this easy; others will find it near impossible. Here the knees can be outside the elbows on the top of the knees pressing into the backs of the upper arms.
Either way you do it once your weight is fully supported by your hands you’ll press or release pressure from the fingertips to keep yourself balanced.

Left: bent arm frogstand; Right: straight arm frogstand.
Stunt #3: The Headstand
When I first started working on a handstand I couldn’t even hold a free balancing headstand very well. This was stupid of me.
The headstand teaches you to keep your body as one unit, but you have a slightly lower center of gravity, as well as a much bigger base of support, making it easier to do then a handstand.
When you’re starting out it is recommended to kick-up against a wall in case you over balance. Once you’re practiced at that, you can start doing the headstand out in the open.
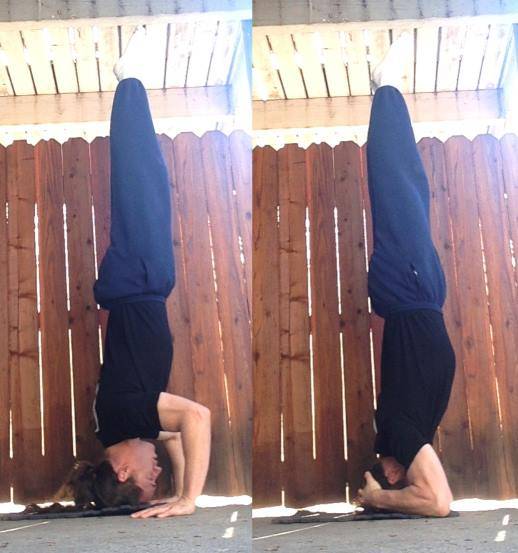
The easiest version of the headstand is the tripod version. Your hands are placed in front of your head so that they form a triangle or tripod. This gives you a big base of support.
With a little practice this position becomes very easy to hold, as you press into the ground and release with the hands to balance, keeping your body stiff and straight the whole time.
A more advanced, and thus harder to balance variation, involves putting your hands in line with your head. Another option is to fold your hands behind your head so just the forearms are contacting the ground.
In both of these your base of support has lessened thus you have to keep your body from moving even more so then before. And you’ll learn how to balance it in the air even better.

Left: tripod headstand; Right: yoga headstand.
Stunt #4: The Forearm Stand
In the forearm stand you’ll once again learn how to balance out in the open. Your center of gravity is lower than a handstand but a little higher than the headstand. You have a very large base of support, which includes the length of your forearms and the hands.
Thus it is easier to balance than the handstand but one step closer to it.
With the forearm stand it is virtually essential to arch your back. If your flexibility and mobility in your back is limited you may need to work on that before beginning this move. As with the other moves it is a good idea to do this move against a wall the first few times you try it.
Lay your forearms and hands on the ground so that they are parallel. It is okay if they angle in slightly. Your head will hover above the arms just slightly but shouldn’t touch the ground.
Starting in the sprinter’s stance in this position you’ll kick up so that you are balanced on your forearms. Use the full length of the arms in order to help you balance and remember to keep the body tight.
How to Train the Lead-Up Stunts
There are a few other lead-up stunts and more variations of these that will transfer over to your ability to do freestanding handstands, but these four will give you more than enough to get started.
My suggestion is to build up to a minute hold in each position. Don’t even attempt a freestanding handstand until after you can do each of these. Then when you start working on the handstand in earnest, you’ll be far ahead of the game.
In my next article I’ll discuss the next steps to take and skills you need, including the most important factor that so many people gloss over (a big mistake I made myself), as you work towards a freestanding handstand.
Photo 1 courtesy of Shutterstock.
Photo 2 courtesy of CrossFit Impulse.


