It’s easy for people to lose sight of why they’re doing any particular exercise. This is compounded when people go down the functional training route. All of a sudden something that started as a good idea can easily become a circus trick. In a previous article on lunges, I spoke of why that movement can be so good for people. Lunges are a midway point between two of our basic postures and they work both legs simultaneously in the same way as gait patterns, with one leg in flexion and the other in extension.
Just as a refresher, those four basic postures are lying, quadruped, kneeling, and standing. With lunging being an exercise that can cover both kneeling and standing, it is easy to see why it can be a fantastic exercise to quickly rebuild function. But what’s the next step?
The Proper Progression
There are only three options when it comes to how we place our feet. In order from most challenging to least challenging, they are:
- Feet together, as if in a squat
- Standing on one foot, as if running
- Split stance, as if in a lunge
If we follow the FMS model, we work our way from easiest to most complex, starting with single-joint movements such as active hip flexion and extension or shoulder mobility before working our way to harder full-body movements like the lunge or squat.
If we’re following that same model and we’ve been working on lunges for a while, then the next step is to address what would be the hurdle step. I think it’s pretty obvious that if we’re standing on one foot it’s going to be harder than a drill that asks us to stand on two feet, like the lunge, but keep in mind that whatever weights you’ve been using are likely going to be too heavy for this new movement, and adjust accordingly.
Leg Lowers as a Midway Point
Before we jump right to the goal exercise, let’s look at a few others that are great midway points before we even get to our feet. Going back to our basic postures we first need an exercise that works both hip flexion and extension while lying. Going back to the matrix I spoke of in the lunge article, our basic progression should be:
- No load and pattern assistance
- No load, with no pattern assistance
- Load, and pattern assistance
- Load, and no pattern assistance
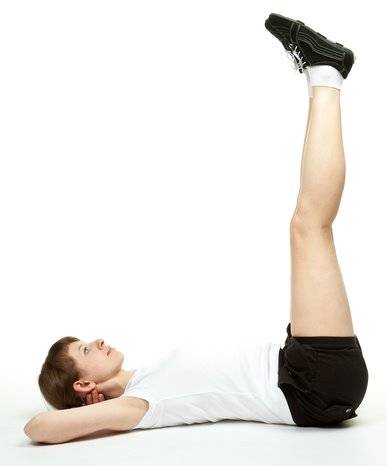
What we’re looking for is an exercise that has both active hip flexion and extension. A great solution is leg lowers. Begin by lying with your back flat on the ground, with both legs raised as high as you can and your knees locked. This is the start and finish position of each rep. Remember the exercise is called leg lowers, not leg raises.
 From the start position lower one leg towards the ground, making sure to pull the top leg towards you as hard as you can the whole time. The key here is that we want to work on flexion and extension, so it isn’t enough just to lower the leg to the ground. Focus on pushing the lowering leg away from you, and on touching the calf to the ground, not the heel. To add our pattern assistance, you could have your arms out to the side slightly and simply push your hands into the ground, which will switch on your abdominals. Leg lowers are a lot harder to perform well than they sound. A few sets of ten will torch most people’s midsections, which is a nice bonus from an exercise that increases hamstring function.
The next step is to be able to do these without lighting up the abdominals. See if you can perform the same leg lowering sequence without pushing your hands into the floor. You may find you’re unable to get your legs raised as high and struggle to keep your knees locked out as well.
Progression and Loading of the Single Leg Deadlift
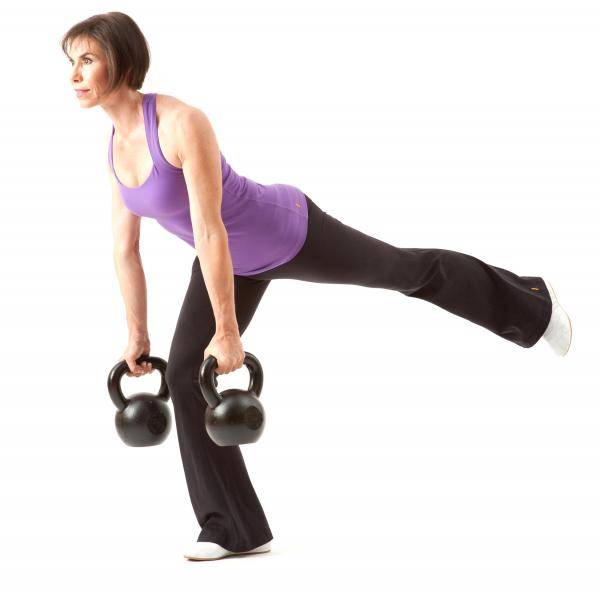
 The lunge is an ideal progression from here if things are progressing well. Again, we can load in many ways as per the original article. Once the leg lowers and the lunge have been nailed down, then the next step is the single leg deadlift (SLDL). The SLDL is a great exercise as it mimics many sporting actions – active hip extension and flexion on a single-leg stance, just like running, kicking, and many other actions.
Following the progression I outlined above, our SLDL work would look like this:
- Perform the SLDL with no load and a dowel to maintain alignment as your pattern assistance.
- Perform the SLDL with no dowel once the pattern has been ingrained.
- Perform the SLDL with load, but using pattern assistance. This step can be a little tricky if you’re training solo, but we can achieve pattern assistance by doing some reactive neuromuscular training (RNT) work on the down leg by having a band attached at the inside of the knee. The band will run across the body, feeding the valgus collapse many have.
- Finally, once the pattern is mastered we’re ready for SLDLs with no pattern assistance and additional load.
Here are video examples of the progressions. We start with no load and a dowel:
Next, here are demonstrations of variou loading options. Note: make sure to extend the back leg hard. Remember that you’re trying to achieve both flexion and extension on each rep – don’t be lazy with the back leg
And finally a rep done with max load:
</span”>
The choice of load for the SLDL can be an interesting discussion. There are only three options: held in two hands, held in the opposing hand (contralateral), and held in the same hand (ipsilateral). Holding the weight in both hands is the easiest option as far as balance is concerned, although obviously the loads can be higher. When it comes to the next two options I rarely, if ever, use the ipsilateral version, preferring to use the contralateral choice. The reason being I find it significantly more challenging and have yet to find anyone who feels the other way. Mike Boyle had an interesting observation about this. He simply tests both versions and then has the athlete train whichever is weakest, knowing that if the person improved then he had succeeded in making him or her better. </span”>
And that’s the big thing to remember about these drills. If you’re using them to become a better athlete, then you probably don’t need to use a two-handed option for SLDLs. You would benefit far more from the challenge brought on by the cross-body demands of the contralateral version. From there, there’s no need to make the exercise harder, unless you want to add weight, because it’s already the hardest version possible.
Remember the goal of an exercise isn’t to become the world champion at that particular exercise, but to use it to improve other elements of your physical training. The SLDL will aid running and kicking, as well as help boost main exercises like the deadlift. Even if you’re ready and willing to deadlift, it’s always good to spend time each year going back to the SLDL and reaping the rewards that come from single-limb training.
Photos 1 & 2 courtesy of Shutterstock.
Photo 3 courtesy of Dragon Door.


