Picture this: you’re out playing basketball with your friends on a Monday night. Pickup games with your friends at the local rec center are one of your favorite ways to blow off some steam and bond with your buddies after work.
Then suddenly it happens. You break away and sprint down the court. You are in the prefect position to get a pass from your teammate and score a three pointer. You plant on your right foot and cut hard to the left. Suddenly, your right knee gives way and your body collapses to the floor. Pain shoots through your knee. You are in shock and thoughts flood your brain: I can’t believe I missed that three point shot! How long will this take to heal? Am I going to have to miss next week’s game? This fictitious play-by-play may sound all too familiar if you have injured your knee while playing a sport in the recent past.
Sam’s Knee Injury Forecast
Enter Sam. I met Sam at the mall last night when I was out running some errands. Sam was working at a kiosk next to the food court, and I couldn’t help but notice that Sam’s leg was in a brace, resting on a chair in front of him. I struck up a conversation with Sam, and he told me the story of how he hurt his knee during a basketball game with his friends. He gave me a play-by-play much like the one at the beginning of this article.
Sam has had x-rays done on his knee, which came out negative, meaning there was nothing shown in the x-rays that indicated damage to his knee. He explained to me that the next step is to meet with an orthopedic doctor and possibly undergo and MRI. Since Sam has not yet had his MRI, we can speculate the following predictable chain of events:
Fast forward three months into the future. Sam has gone through the MRI, and no damage was shown to the knee. The ligaments are all intact. There is some minor damage to the meniscus, the doctor says, but nothing worth operating on. The prescription: rest, ice, anti-inflammatory medication, physical therapy, and then get back to his regular activities when the knee is feeling better.
Fast forward another three months in our prediction of events. At six months since the injury, Sam has been good at following all of the doctor’s recommendations. He has not played a single game of basketball (this has been torturous), and he has gone to physical therapy once per week for eight weeks.
Sam is itching to get back on the court. He has gained some weight since the injury, and after being sedentary for six months, he is not feeling like his old self anymore. He is worried that if he hits the courts again, he will re-injure his knee. Paralysis sets in and Sam does nothing, for fear of the unknown.
If you have suffered a recent knee injury yourself, this scenario may ring a bell. The question is, what do you do at this point? You have exhausted the traditional forms of medical treatment that are available to you. You have done everything the doctor told you to do. You are dying to get out and play again, but you know deep down in your gut that you are just not ready yet. Your knee doesn’t feel normal. What is going on?
An Injured Knee From Sitting Too Much?
Let’s take a step back and revisit my conversation with Sam at the mall. After he shared his story of how he hurt his knee, I asked Sam if the thought ever crossed his mind that his posture could have anything to do with his knee injury. At first Sam looked at me like I was from Mars. I proceeded to ask Sam if he would allow me to show him what I mean by posture. Sam agreed to let me take a picture of him, which I have included here:
Don’t forget the bigger picture—your posture matters. [Photo credit: Maryann Berry]
When I showed Sam his photo, I asked him what he saw and the first thing he pointed out was the curve of his back. He immediately knew that his back was not supposed to be excessively curved like this, and without hesitation he asked me why this happens. I explained to Sam that we all have compromised posture because we don’t move enough.
At first he got a little bit defensive in response to my statement and explained that he used to work out three times per week. My rebuttal was to have Sam calculate how many hours per day he has spent sitting on average since he was six years old. After thinking about this for a few moments, a smile crept onto his face and I immediately knew he understood. He said that when he was a kid he sat in school for about five hours per day. Now he is in school full time to get his MBA, and he is sitting in class or sitting to study nearly all day long. When he commutes from home to school, or from home to work, he is sitting in his car driving. I didn’t have to explain any further, as it was obvious to Sam that the majority of his day to day life involved little to no movement.
I proceeded to explain that when we spend a lot of time sitting, our bodies lose balance and strength and our posture suffers. When we go out to play a fun game of basketball with our friends, our muscles and joints are not in a good position and we are prone to injuries such as the knee injury that he was suffering from.
Time for the posture intervention.
Load Bearing Joints as a System
Let’s talk anatomy and the basic design of the human body. The human body is comprised of eight major load bearing joints: shoulders, hips, knees, and ankles. These joints work in unison with one another when they are properly aligned, as shown in the image below of Function Freddie.
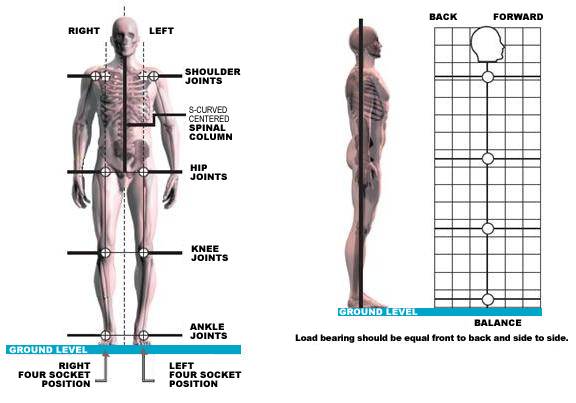
Everything is connected. [Photo credit: Egoscue University]
The hip, knee, and ankle joint are designed to stack one on top of the other in a straight line with the feet pointed straight ahead. Now let’s take a closer look at the mechanics of the hip, knee, and ankle:
- The knee joint is a hinge. Just like the hinge on a door, this joint is designed to open and close, thus moving the knee through flexion and extension.
- The hip joint is a ball and socket joint, and is able to move through a full circle.
- The main ankle joint is a hinge, much like the knee, and is able to move the foot up and down. This main joint of the ankle, combined with the subtalar joint, work together to form a system that can move in a full circle, similar to a ball and socket joint.
What happens when a person spends a lot of time sitting (which we all do)? The pelvis loses its ability to move through a full range of motion due to muscle tightness and weakness. Over time, the hips become unbalanced, usually with one side that is stronger or more dominant than the other. Lack of movement, sitting, and shoes can all lead to reduced range of motion in the ankle joint as well.
When the ankle and the hip lose function and mobility, the knee joint, which is trapped in the middle, then gets asked to move like a ball and socket, which we know is not its intended function. This extra demand on the knee can lead to soft tissue damage or an injury like the one that Sam suffered.
It is important to see the bigger picture and to recognize that a knee injury is rarely a knee problem, but rather a hip, knee, ankle problem. Check out the following photos of people who started out with misaligned knees. In all three of the after photos, you will see the misalignments have been corrected or greatly improved.
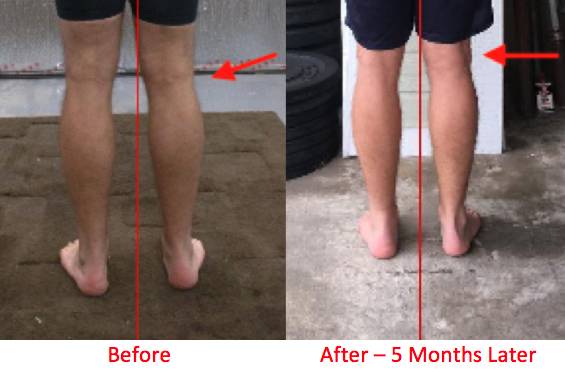

When the joints don’t work in unison, imbalance is the result. [Before and after photos credit: Maryann Berry]
If you have recently injured your knee, and the connection between your knee injury and your posture makes sense to you, the next step is to go see a practitioner that specializes in posture for an assessment. This practitioner can guide you in the direction of the exercises that you need to do in order to correct your specific muscular imbalances. This customized approach is the best way to eliminate the guesswork, and ensure your long term success.
Exercises for Better Knee Alignment
For some generalized guidance on exercises to balance and strengthen the hips and knees, check out the following program. I personally have overcome knee pain after undergoing an ACL replacement and dealing with chronic knee pain for 10 years. Today, my knee is pain-free, and the following exercises have all been a part of my routine at one point or another.
I recommend starting out by doing the entire series of exercises at least once. Then choose the exercise(s) that you feel target the areas where you need to strengthen or stabilize, and incorporate those exercises into your regular routine.
Now let’s get started!
Inner and Outer Thighs
Sets/Reps:
1 set of 20 reps (on both inner and outer thighs on each leg)
Purpose:
To activate and strengthen adductor and abductor muscle groups.
Instructions:
- Lie on your side.
- Rest your head on your hand and brace yourself with the other arm, placing your palm flat on the floor.
- Bend the top leg and place your foot flat on the floor in front of your thigh.
- Raise and lower the bottom leg up 3-4 inches off the floor then back to the floor and repeat 20 times to work the inner thigh. You should feel this in the inner thigh.
- Keep the thigh of the bottom leg tight and your toes flexed back.
- Switch sides by stacking the legs, then bend the knee of the bottom leg back behind you. Be sure your knees are stacked on top of each other and your thighs are parallel to each other.
- Hold the top leg straight with your thigh tight and your foot flexed.
- Raise and lower the top leg 20 times to work the outer thigh.
- Key point: Keep your heel higher than your toes by slightly internally rotating your leg. This is critical in order for you to activate glute medius. You should feel this in your glutes.
- Roll to the other side and repeat the entire sequence.
Focus on: Keeping the thigh of the working leg tight and the foot flexed.
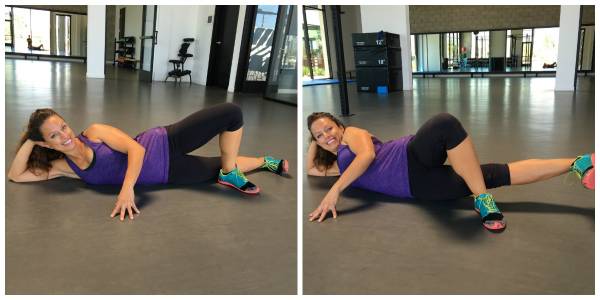
Left: Inner thigh, position one; Right: Inner thigh, position two. [Photo credit: Maryann Berry]
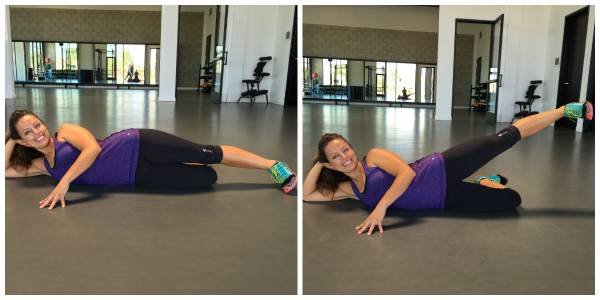
Left: Outer thigh, position one; Right: Outer thigh, position two. [Photo credit: Maryann Berry]
Abductor Presses
Sets/Reps:
3 sets of 20 reps
Purpose:
To activate the abductor muscle group (outer hip).
Instructions:
- Lie on your back with your knees bent and feet flat on the floor pointed straight ahead.
- Place a strap or belt around your knees. Your knees should be bent and fist-width apart (about four inches).
- Set your feet hip-width apart with the outer edges of your feet straight.
- Press outward against the strap and then release. Be sure the knees aren’t wider than hip width when pressing against strap or belt. Continue to press and release for a total of three sets of 20 reps.
- You should feel this in your outer hip/glute area.
- Be sure to keep your stomach and upper body relaxed.
Focus on: The set up. You will get the most benefit by starting off with your feet and knees hip width apart and your feet straight.
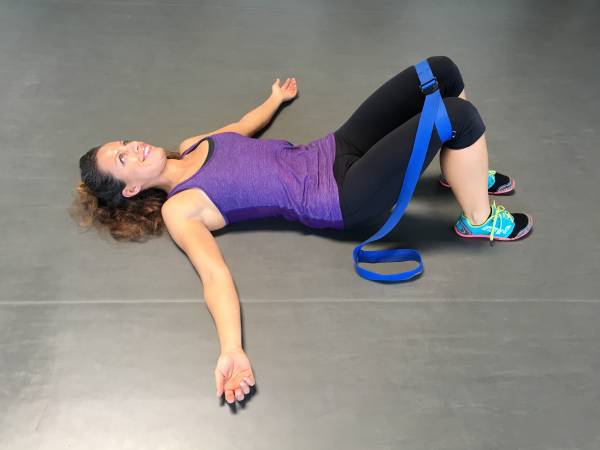
Abductor press. [Photo credit: Maryann Berry]
Hip Flexor Leg Lifts
Sets/Reps:
2 sets of 20 reps on each side
Purpose:
To promote knee extension and to strengthen the hip flexors and quads.
Instructions:
- Lie on your back with one leg bent and the other leg extended straight out in front of you.
- Prop yourself up on your elbows and look straight ahead. Roll a small arch into your lower back.
- Tighten the thigh of your straight leg and pull your toes back toward you.
- Hold this tightened position while lifting and lowering this leg from the floor up to the level of the bent leg and down again. You should feel this in your quad and the crease of the hip.
- After 20 reps, switch legs and repeat.
Focus on: Maintaining the arch in the low back. If you lose the arch the exercise will feel really easy and will defeat the purpose. If you cannot maintain the arch while achieving the proper height of the leg you are working, then lift the leg as high as you can while maintaining the arch in your low back.
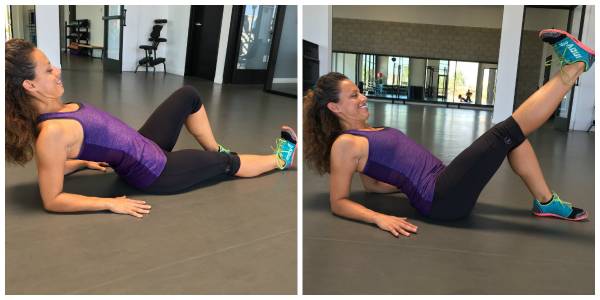
Left: Hip flexor, position one; Right: Hip flexor, position two. [Photo credit: Maryann Berry]
Invisible Leg Press
Sets/Reps:
2 sets of 10 reps
Purpose:
This exercise does a lot of things all at once. This works both the quads and hamstrings. This also works the shin muscles and promotes dorsiflexion of the ankle. Finally, this exercise activates the abductor muscles of the hips for an overall total leg and hip workout.
Instructions:
- Place a strap around your ankles so that your ankles are one fist width apart.
- Lie on your back and fully extend your legs in the air.
- Allow your arms to rest at a 45 degree angle with your palms facing up.
- Maintain constant pressure outward on the strap in order to feel muscles work in your hips.
- Flex your ankles back so that the tops of your feet are parallel to the ceiling.
- Slowly bend your knees while keeping your feet parallel to the ceiling. Only go as far as you can go without loosing position with your feet. At this point you should feel a stretch in your claves and muscle work in your shins.
- Extend your legs back to the straight position and contract your quads at the top to finish the rep and you will feel your quads burn.
Don’t forget to continuously press outward against the strap. Pretend that your heels are sliding up and down an imaginary plate of glass, but you do not want your heels to break through the glass away from you—and keep your feet straight.
In order to practice keeping your feet and ankles in the correct position, place a lightweight, flat object on the soles of your feet. Go through the reps without allowing the object to slant or drop.
Focus on: Keeping the soles of your feet parallel to the ceiling throughout the entire exercise. If done correctly, the range of motion of the legs moving down and up will be about four to six inches. The most important factor is keeping the feet parallel to the ceiling, not how low you can bring your legs.
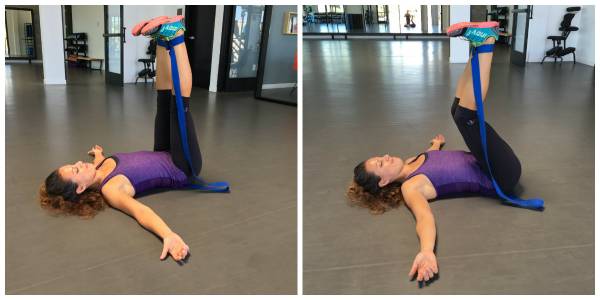
Left: Invisible leg press, position one; Right: Invisible leg press, position two. [Photo credit: Maryann Berry]
Put Posture Intervention to Use
I hope you have enjoyed and will be able to put this posture intervention to good use. No matter what course of action you choose to heal your knee, don’t forget the bigger picture: everything is connected!
More on posture and alignment:
Two Alignment Fixes to Prevent CrossFit Injuries
Disclaimer: The information contained in this article is for informational purposes only. The purpose of this article is to promote broad reader understanding and knowledge of various health topics. It is not intended to be a substitute for professional medical advice, diagnosis, or treatment. Always seek the advice of your physician or other qualified health care provider with any questions you may have regarding a medical condition or treatment and before undertaking a new health care regimen. Never disregard professional medical advice or delay in seeking it because of something you have read in this article.

