In this fit-food, clean-eats, paleo/primal movement, I often come across great ideas (and some not so great) with either poor instruction or poor execution. Sometimes I fear I, too, have neglected my duties as a teacher.
So, I am embarking on a short series of articles on basic techniques people can use to make all kinds of wonderful meals. As always, I shall indulge in a little creativity, too. I think it is sensible to start with the cornerstone of a paleo-ish life, so let’s talk about meat!
Before You Begin: Get a Good Thermometer
My first tip is another little repent. I completely forgot to include the most basic addition to any kitchen in my Christmas wish list article: a digital probe thermometer. This is an invaluable addition to any kitchen and, in these days of that famous Internet shopping goliath, it is readily available for just a few quid/bucks.
With a temperature probe in your arsenal, the perfectly cooked steak is elusive no more. Creating one becomes a simple application of knowledge, which I will go into shortly. Sames goes for a roast or stew.
Cooking Chops and Steaks
Let’s start with chops, or steaks if you prefer. Basically, these are single servings of a tender cut of meat, which we will cook rapidly with a high heat. My preferred method is in a flat pan or on the barbecue, but some people prefer a broiler.
There are few pointers to this method that a lot of people don’t know:
- Temperature: Never cook meat straight from the fridge. Give your meat half an hour to come to room temperature. Then the cooking process won’t have that fifteen to thirty degree temperature difference to make up before the cooking even begins. In the case of rapid cooking, making up for that difference may never happen, leaving you with a burnt outside and a raw middle.
- Salt and Pepper: Don’t pepper your chop until after cooking. The temperature required to cook the meat well will also burn the pepper, making it slightly bitter. Salt is fine before cooking, contrary to some advice. Although it will draw out water, it is no more than will be evaporated through the cooking process anyway.
- Flipping: Flip often, every fifteen seconds or so. This may seem over the top and maybe even counterintuitive. I used to think that disturbing the meat as little possible would speed up the process and thus yield the best results. But having read about and applied a regular flipping technique, I found that allowing some of the work to be done by the residual heat results in a much more palatable, evenly cooked slab of meat.
- Rest: There is no division of opinion among professionals here, yet it is often overlooked in a domestic setting. The term “rest” is quite literal. When you apply heat to the meat the proteins contract, forcing out moisture that remains within the meat but runs out when cut. When you rest the cooked meat those fibers relax, drawing the liquids back in and giving you a consistently moist cut of meat. This prevents that leaking-onto-the-plate thing that scares people a bit. It also allows for an even level of cooking and makes the meat more tender.
- Cooking Medium: Choose a frying medium that has a high smoking point. Sadly, olive oil will not do as it burns at a relatively low temperature. Lard, ground nut oil, rapeseed oil, or coconut oil are all good choices. My preference is lard as it is neutral in flavor and has a high smoke point.
Core Temperatures
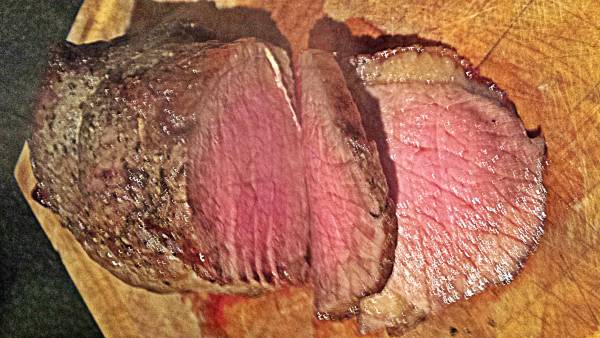
Here comes the science bomb: the core temperatures to aim for. These are most commonly applied to cooking beef steak, but they apply to all meats. The temperature is measured by inserting the tip of the probe into the meat. Aim to hold it at the center. Be careful not to push it too far because you may end up measuring the temperature of the pan.
The temperatures I list below are the temperatures to look for on the probe screen. They are actually five degrees less than the temperature will be after resting.
- 40ºC (104ºF) – Rare
- 45ºC (113ºF) – Medium rare
- 50ºC (122ºF) – Medium
- 55ºC (131ºF) – Medium well
- 60ºC (140º) – Burned (sorry, “well done”)
After the meat has come out of the pan, add freshly ground black pepper. Then, I like to give it a quick brush of oil. This prevents the surface of the meat from getting dry and improves the appearance. It is also an opportunity to add a little flavor if you wish.
Recipe: Basic Pork Chops
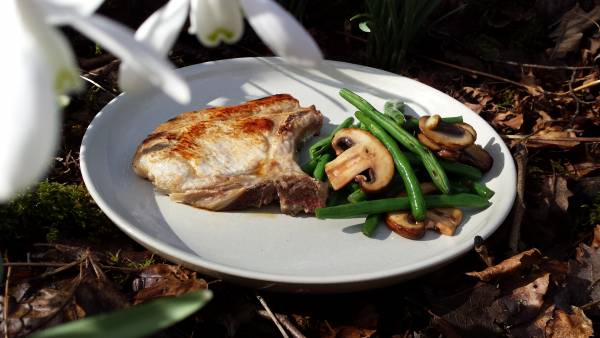
This is a typical meal for me. I cook a piece of meat as above, more often than not pork as it is better value. Then as the meat is resting, I sauté some vegetables. There is a lot of scope for preference and creativity here. Oh, and I only use one pan, too.
Ingredients:
- 2 pork chops
- 200g (7oz) mushrooms
- 200g (7oz) green beans
- 2 garlic cloves
- 1 lemon
- Lard for frying
- Olive oil
Method:
- Make sure your chops have been out of the fridge for half an hour or so. Put a bit of water and a pinch of salt in the pan and set on a high heat. When the water boils, add the beans and cook for one minute. Drain the beans in a colander and cool quickly in cold water, then drain.
- Put the pan back on a high heat with a little lard. When the pan is really hot, salt your chops and lower into the pan slowly. Flip every fifteen seconds. After six flips, start to probe the meat. After each flip, insert the probe into the center of the meat. In the case of pork I aim for medium well, 55ºC (131ºF).
- When the meat reaches the desired temperature, remove and set aside somewhere draft-free. Sprinkle with pepper and brush with olive oil.
- Now add the crushed garlic to the pan, along with the sliced mushrooms and blanched beans. Toss the vegetables in the pan until they start to take on a little color. Then add a squeeze of lemon and serve.
Roasting
Now on to the next cooking method: roasting. Cooking your meat slowly at a relatively low temperature is one way to roast it. But this would not brown the meat and give you any yummy caramelized bits (this is known as the Maillard reaction, if you’re interested). So what we do is have a sizzle time first, where we cook the meat at a very high temperature for twenty minutes.
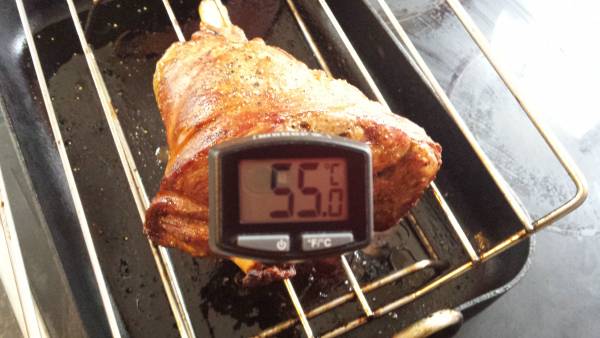
To roast your meat, take it out of the fridge at least half an hour before cooking. Then heat your oven up very high to 220ºC-240ºC (425ºF-450ºF). Salt the meat, then place it on a rack in a roasting tin (if you have a rack). Put it in the oven for twenty minutes.
After the sizzle, remove the meat from the oven and turn the temperature down to 140ºC (275ºF). Pepper the meat and return to the oven. Now give it twenty minutes per 500g (approximately 1lb) Probe the meat to take the temperature at the center. The same cooking temperatures apply. Rest for half an hour before you dare carve it.
Slow Cooking
Slow cooking either in a pan on the stovetop or in a slow cooker is brilliant. If you have enough time to ignore your dinner for a few hours, you can be treated to some of the tastiest dishes from the cheapest cuts.
The cheaper cuts of meat tend to be the tougher ones. They are tough because they have a high amount of connective tissue. This is good news for us fit freaks, because that connective tissue is pure protein that breaks down when subjected to low heat for a long time. Then your body can process it and use it to get da gainz. How cool is that? All you need is patience and a little technique.
Here are some of my tips for perfect slow cooking:
- Browning: Although it is not essential to brown the meat first, I would always recommend it otherwise the results can be a tad insipid. This is simply done by cooking the meat in small batches in a very hot pan for a few minutes. Don’t overcrowd the pan as it will slow down the whole process.
- Thickening: Again, you don’t have to thicken the sauce but not doing so can leave you with a watery sauce. The protein that dissolves will thicken slightly, but if you want to thicken it some more, which I would recommend, then you have two options: wheat flour or corn flour.
- Wheat Flour: Wheat flour has to be cooked out, otherwise it will give a raw flavor. So what we do is roll the meat in flour with a little salt, pat off the excess, then cook in a pan. The flour will combine with any fats during the cooking process and thicken the sauce.
- Corn Flour: Given the recent enlightenment to wheat intolerances, corn flour is making a comeback. It doesn’t need cooking out like wheat flour. However, just throwing it in slapdash will leave you with a lumpy sauce. Corn flour thickens when heated to boiling point, and if it isn’t evenly distributed it will set in dollops and look lumpy. So what you have to do is mix the corn flour with a little cold water and mix to a smooth paste. Then take whatever you are thickening off the heat, stir in the corn flour paste, and put it back on the heat. When the corn flour cooks it will thicken. This technique is often used for gravy.
- Tomato Puree: A lot of stew recipes include tomato puree. It always needs a little frying, otherwise it will lend a very bitter flavor to your stew. So I usually add it to the vegetables as they fry.
Recipe: Basic Stew
A basic stew consists of a tough cut of meat, the trinity of vegetables (carrot, onion, and celery), and liquid stock and/or booze. All of the stew/casserole one-pots tend to be a variation on that theme. You then add other applicable flavors like herbs and maybe some spices. I will illustrate the corn flour thickening technique here.
Ingredients:
- 500g (approximately 1lb) meat – beef is what I have today
- 2 carrots, roughly chopped
- 1 large onion, also roughly chopped
- 2 sticks of celery, again, roughly chopped
- 1 Tablespoon tomato puree
- 1 liter (4 cups) stock
- A sprig each of thyme and rosemary, and a bay leaf (optional but recommended)
- 1 Tablespoon corn flour
- Salt and pepper
Method:
- Heat up a large heavy pan over a medium high heat with a little lard in it. When the pan is hot, add the meat in a single layer. (This is why you have to do it in batches.) Keep turning until brown, then set aside. Repeat with the rest of the meat.
- Once all of the meat is browned, then tip in the chopped vegetables. Again, stir it all around until it catches a little color, then add the tomato puree and cook for a further minute. As I said, never use tomato puree without frying it a bit.
- Add your liquid. If you are using an alcohol like ale or wine, that would go in now and be left for a few minutes to reduce. Tip in the stock and add the browned meat back in along with any juices that have seeped out.
- Bring to the boil then turn the heat right down to a simmer. By that I mean so low that just a single small bubble breaks the surface at a time. Then leave for at least two hours. Four is better. Some recipes call for all-night cooking with a tough cut like oxtail.
- Now take the pan off the heat, add the herbs, then mix the corn flour in a small cup with a little bit of water to form a thin paste. Add the paste to the stew while continuously stirring to ensure it disperses evenly. Then put it back onto a high heat. When it comes to the boil it will thicken and you are done.
More Articles for Meat Lovers:
- Is Red Meat Actually Dangerous? Or Do We Actually Need It?
- Game On: 3 Classic Wild Game Recipes, With a Twist
- Home Curing 101: Create Delicious Cured Meats at Home
- The Newest Articles on Breaking Muscle


